It’s especially annoying when the scribble on the screenshot is red. If your aim is to mask this, you’re going to struggle. With red drawings, you need to use a clone or stamp tool to get rid of them. You can use techniques like blurring because it’ll still be very obvious. A high-end photoshopping software such as Photoshop, getting rid of scribbles is typically accomplished by using the background to mask over the scribbles, resulting in the scribbles disappearing and appearing in the background or screenshot that you selected. If you don’t want to download apps on your Android or iPhone, then you can use an online tool like Photopea (free version of photoshop and you can use it online) which has a clone tool as well as a stamp tool which is all you need to remove scribbles on a screenshot.
How to Remove Scribbles On a Screenshot
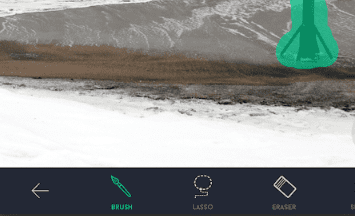
1. Using TouchRetouch
It’s horrifying to discover a picture or screenshots that’s been viciously scribbled on, and, understandably, to feel there’s absolutely no hope of fixing it. Well, here’s where you’re wrong. By using the app ‘TouchRetouch,’ available on iOS and Android, you can remove scribbles and drawings on a picture of your choice. The TouchRetouch app will allow you to remove doodles on photos or screenshots on your Android device as well as your iPhone. Getting rid of scribbles can also be done on high-end photoshopping software such as Photoshop and it usually consists of you using the background to mask over the scribbles so that the scribbles disappear and looks like the background or another location of the photo or screenshot that you selected. The TouchRetouch, unfortunately, costs some small change. It’s $1.99 on the day this article was published. Tap ‘Buy’ and, after you confirm your payment method and any other needed information, it will automatically download and install the TouchRetouch app straight to your Android device.
- Choose the location of the screenshot you have a desire to alter or you can take your own.
- There’s several tools to use in the TouchRetouch app, like:
Brush Lasso Erase And Settings.
Each tool, obviously, does something different, however, the tools ‘Brush’ and ‘Lasso’ are the same tool only the way they’re use is different. For example, when you want to remove scribbles from a screenshot, you can either use a big brush and get the general area, or use the lasso tool for slightly more precision.
At any rate, the tool you want to use is the ‘Brush’ tool. Go ahead and select it. You’ll get the opportunity to adjust the size of your brush to the size you need. If it’s small scribblers, go for a smaller brush size. After you’ve select the Brush tool, take your finger and highlight the scribbles you want to erase.
When you’re satisfied with what you’ve highlighted, tap ‘GO’ and the TouchRetouch will remove the object. However, since removing the object leaves a void behind (since the textures were photographed behind the object) TouchRetouch will actually snag the surrounding textures and match the void to the surrounding textures as best as possible. In fact, if you aren’t satisfied with the retexture, you can retouch the photo as many times as you want.
2. Stamp Tool Photoshop
If the background of the rest of the picture and where the scribbles are is similar, then you can use the Stamp Tool. The Clone Stamp tool allows you to paint one part of an image over another part of the same image. To use the Clone Stamp tool, click and hold the rubber stamp icon in the toolbox and select Clone Stamp Tool in the flyout menu. From here, you can adjust the brush size and shape, flow, opacity, and blending modes.
3. Clone Tool In Photoshop
You can use the clone tool in Photoshop which will allow you to use one part of the screenshot to get rid of the scribbles. In Photoshop, the clone tool erases scribbles from pictures by using the information from one part of the image to replace another part of the image which would be the scribbles. To use the clone tool, select the Clone Stamp tool and position the cursor over the area you want to clone and then Alt-click (Windows) or Option-click (Mac) to define the clone source. Once defined, position the cursor over the scribbles so that you can start to paint the cloned pixels to get rid of the scribbled.
4. Gimp
Several digital tools are included in GIMP version 2.8 that may get used to define undesired sections of your image. You should click and drag your cursor around it to determine the region’s boundary you desire to isolate. A keyboard shortcut cuts or deletes the area you have selected, leaving a blank space for you to alter your visual message once it has been created. The Clone tool copies an image or pattern using the current brush as a template. Select the tool icon from the tool palette on the left-hand side of the screen. Clone, adjust the settings you find in the palette below to establish the size of the brush and hardness, then go to the image and pick a source area to be taken to “clone” it above the doodling, and then click on the clone button. Use the Ctrl key to choose the region to be copied, then click on the first piece of the scribble inside the snapshot to select it for copying. The technique has several applications, the most notable of which is fixing damaged regions in digital photographs by “painting over” them with pixel data from other photograph parts. It takes some time to master this method, but it may be pretty effective in the hands of an experienced practitioner.
5. Adobe Photoshop Lightroom
If you attempted to cover over a portion of a screenshot using the brush tool, the resulting region would be flat and devoid of any depth, tone, or shading. As a result, the painted area would be visible to the spectator. Adobe created the Clone Stamp tool in lightroom to allow for more nuanced picture manipulation. The Clone Stamp tool in Photoshop allows you to duplicate one portion of an image onto another section of the same picture. Photographers and designers frequently use the Clone Stamp tool to eliminate undesired components from photographs they have taken or designed. Using it, for example, you may disguise flaws on people’s faces by duplicating them from another section of their skin, or you can eliminate trees from a mountain vista by copying portions of the sky over them. The Clone Stamp allows you to paint with pixels that have been cloned from one piece of a picture and pasted onto another part of it. Consequently, the corrected region is virtually indistinguishable from the remainder of the image. As a result, if you know how to use one of the Clone Stamp’s descendant tools, you can use them all. It is especially true for the Pattern Stamp and Healing Brush, all descended from the Clone Stamp.
6. Adobe Photoshop Fix
Using Photoshop, it is often possible to remove doodles from screenshots and images; however, the operations’ complexity depends on where the mark to be removed is placed. For example, if it is over an area of a monochrome photograph, it will be easier to delete than above the subject. The most common cause for the Clone Stamp to cease operating is that the incorrect layer has gotten selected, which is the default. The improper layer selection in the Layers Panel may cause your edits to be concealed or the wrong sample used in your final image. The Clone Stamp tool in Photoshop Fix provides an even more effective method of copying a portion of a picture to another section of the same photo. Using your finger, press on the “source region” that you wish to replicate, and then drag it to another portion of the same picture with the brush tool.
7. Clip Studio Paint
Featuring a variety of helpful and distinctive features, Clip Studio Paint is a highly adaptable digital painting application that is great for rendering and inking work. It is simple to learn, and it comes with a large number of tools and unique brushes that allow you to paint and create any style of artwork you choose. Clip Studio Paint is the ultimate marriage of Adobe Photoshop and Paint Tool SAI. It is available for both Mac and Windows. It combines the most remarkable features of both programs for painters in a single package at the most competitive price. The tiny Paint Tool SAI application is less intimidating for beginning digital artists, and it is a beautiful beginner’s program for those just starting. Even though Clip Studio Paint is not designed for image editing, it has several ideal functions for cleaning up scans and pictures and preparing your images for printing.
8. inPixio Remove background
InPixio is a collection of independent apps that differ in specialized features and tools designed to deal with a particular photograph component. These tools assist in changing the backdrop of a photograph, removing unwanted parts from a picture, and creating beautiful collages. Suppose you are new to photography and need to quickly and easily enhance your images. In that case, InPixio is the perfect choice for you since it offers several simple-to-use features that eliminate distracting aspects from the picture, as well as a steady learning curve. Many options are available in InPixio, including light control (exposure, brightness, contrast) levels correction (curves, and color correction). Aside from that, the software offers a variety of frames and preset filters, textures, and effects, such as soft focus, noise reduction, and vignette. You can easily erase undesired information from a photograph without sacrificing image quality with the Erase feature. You have the option of deleting the highlighted zones or restoring the background. Editing the image is easier with the pick option that includes intelligent color detection. With its assistance, you may effortlessly take off any scribbles on your screenshot.
The Takeaway
You may find yourself having to share a screenshot that you would have scribbled on. Fortunately, it has become easy to remove any marks on pictures before you share them again. This article gave you five of the apps you can use to edit your screenshots without compromising the quality of your photos.
Δ

title: “How To Remove Scribbles On A Screenshot” ShowToc: true date: “2022-12-15” author: “Martin Cheek”
It’s especially annoying when the scribble on the screenshot is red. If your aim is to mask this, you’re going to struggle. With red drawings, you need to use a clone or stamp tool to get rid of them. You can use techniques like blurring because it’ll still be very obvious. A high-end photoshopping software such as Photoshop, getting rid of scribbles is typically accomplished by using the background to mask over the scribbles, resulting in the scribbles disappearing and appearing in the background or screenshot that you selected. If you don’t want to download apps on your Android or iPhone, then you can use an online tool like Photopea (free version of photoshop and you can use it online) which has a clone tool as well as a stamp tool which is all you need to remove scribbles on a screenshot.
How to Remove Scribbles On a Screenshot
1. Using TouchRetouch
It’s horrifying to discover a picture or screenshots that’s been viciously scribbled on, and, understandably, to feel there’s absolutely no hope of fixing it. Well, here’s where you’re wrong. By using the app ‘TouchRetouch,’ available on iOS and Android, you can remove scribbles and drawings on a picture of your choice. The TouchRetouch app will allow you to remove doodles on photos or screenshots on your Android device as well as your iPhone. Getting rid of scribbles can also be done on high-end photoshopping software such as Photoshop and it usually consists of you using the background to mask over the scribbles so that the scribbles disappear and looks like the background or another location of the photo or screenshot that you selected. The TouchRetouch, unfortunately, costs some small change. It’s $1.99 on the day this article was published. Tap ‘Buy’ and, after you confirm your payment method and any other needed information, it will automatically download and install the TouchRetouch app straight to your Android device.
- Choose the location of the screenshot you have a desire to alter or you can take your own.
- There’s several tools to use in the TouchRetouch app, like:
Brush Lasso Erase And Settings.
Each tool, obviously, does something different, however, the tools ‘Brush’ and ‘Lasso’ are the same tool only the way they’re use is different. For example, when you want to remove scribbles from a screenshot, you can either use a big brush and get the general area, or use the lasso tool for slightly more precision.
At any rate, the tool you want to use is the ‘Brush’ tool. Go ahead and select it. You’ll get the opportunity to adjust the size of your brush to the size you need. If it’s small scribblers, go for a smaller brush size. After you’ve select the Brush tool, take your finger and highlight the scribbles you want to erase.
When you’re satisfied with what you’ve highlighted, tap ‘GO’ and the TouchRetouch will remove the object. However, since removing the object leaves a void behind (since the textures were photographed behind the object) TouchRetouch will actually snag the surrounding textures and match the void to the surrounding textures as best as possible. In fact, if you aren’t satisfied with the retexture, you can retouch the photo as many times as you want.
2. Stamp Tool Photoshop
If the background of the rest of the picture and where the scribbles are is similar, then you can use the Stamp Tool. The Clone Stamp tool allows you to paint one part of an image over another part of the same image. To use the Clone Stamp tool, click and hold the rubber stamp icon in the toolbox and select Clone Stamp Tool in the flyout menu. From here, you can adjust the brush size and shape, flow, opacity, and blending modes.
3. Clone Tool In Photoshop
You can use the clone tool in Photoshop which will allow you to use one part of the screenshot to get rid of the scribbles. In Photoshop, the clone tool erases scribbles from pictures by using the information from one part of the image to replace another part of the image which would be the scribbles. To use the clone tool, select the Clone Stamp tool and position the cursor over the area you want to clone and then Alt-click (Windows) or Option-click (Mac) to define the clone source. Once defined, position the cursor over the scribbles so that you can start to paint the cloned pixels to get rid of the scribbled.
4. Gimp
Several digital tools are included in GIMP version 2.8 that may get used to define undesired sections of your image. You should click and drag your cursor around it to determine the region’s boundary you desire to isolate. A keyboard shortcut cuts or deletes the area you have selected, leaving a blank space for you to alter your visual message once it has been created. The Clone tool copies an image or pattern using the current brush as a template. Select the tool icon from the tool palette on the left-hand side of the screen. Clone, adjust the settings you find in the palette below to establish the size of the brush and hardness, then go to the image and pick a source area to be taken to “clone” it above the doodling, and then click on the clone button. Use the Ctrl key to choose the region to be copied, then click on the first piece of the scribble inside the snapshot to select it for copying. The technique has several applications, the most notable of which is fixing damaged regions in digital photographs by “painting over” them with pixel data from other photograph parts. It takes some time to master this method, but it may be pretty effective in the hands of an experienced practitioner.
5. Adobe Photoshop Lightroom
If you attempted to cover over a portion of a screenshot using the brush tool, the resulting region would be flat and devoid of any depth, tone, or shading. As a result, the painted area would be visible to the spectator. Adobe created the Clone Stamp tool in lightroom to allow for more nuanced picture manipulation. The Clone Stamp tool in Photoshop allows you to duplicate one portion of an image onto another section of the same picture. Photographers and designers frequently use the Clone Stamp tool to eliminate undesired components from photographs they have taken or designed. Using it, for example, you may disguise flaws on people’s faces by duplicating them from another section of their skin, or you can eliminate trees from a mountain vista by copying portions of the sky over them. The Clone Stamp allows you to paint with pixels that have been cloned from one piece of a picture and pasted onto another part of it. Consequently, the corrected region is virtually indistinguishable from the remainder of the image. As a result, if you know how to use one of the Clone Stamp’s descendant tools, you can use them all. It is especially true for the Pattern Stamp and Healing Brush, all descended from the Clone Stamp.
6. Adobe Photoshop Fix
Using Photoshop, it is often possible to remove doodles from screenshots and images; however, the operations’ complexity depends on where the mark to be removed is placed. For example, if it is over an area of a monochrome photograph, it will be easier to delete than above the subject. The most common cause for the Clone Stamp to cease operating is that the incorrect layer has gotten selected, which is the default. The improper layer selection in the Layers Panel may cause your edits to be concealed or the wrong sample used in your final image. The Clone Stamp tool in Photoshop Fix provides an even more effective method of copying a portion of a picture to another section of the same photo. Using your finger, press on the “source region” that you wish to replicate, and then drag it to another portion of the same picture with the brush tool.
7. Clip Studio Paint
Featuring a variety of helpful and distinctive features, Clip Studio Paint is a highly adaptable digital painting application that is great for rendering and inking work. It is simple to learn, and it comes with a large number of tools and unique brushes that allow you to paint and create any style of artwork you choose. Clip Studio Paint is the ultimate marriage of Adobe Photoshop and Paint Tool SAI. It is available for both Mac and Windows. It combines the most remarkable features of both programs for painters in a single package at the most competitive price. The tiny Paint Tool SAI application is less intimidating for beginning digital artists, and it is a beautiful beginner’s program for those just starting. Even though Clip Studio Paint is not designed for image editing, it has several ideal functions for cleaning up scans and pictures and preparing your images for printing.
8. inPixio Remove background
InPixio is a collection of independent apps that differ in specialized features and tools designed to deal with a particular photograph component. These tools assist in changing the backdrop of a photograph, removing unwanted parts from a picture, and creating beautiful collages. Suppose you are new to photography and need to quickly and easily enhance your images. In that case, InPixio is the perfect choice for you since it offers several simple-to-use features that eliminate distracting aspects from the picture, as well as a steady learning curve. Many options are available in InPixio, including light control (exposure, brightness, contrast) levels correction (curves, and color correction). Aside from that, the software offers a variety of frames and preset filters, textures, and effects, such as soft focus, noise reduction, and vignette. You can easily erase undesired information from a photograph without sacrificing image quality with the Erase feature. You have the option of deleting the highlighted zones or restoring the background. Editing the image is easier with the pick option that includes intelligent color detection. With its assistance, you may effortlessly take off any scribbles on your screenshot.
The Takeaway
You may find yourself having to share a screenshot that you would have scribbled on. Fortunately, it has become easy to remove any marks on pictures before you share them again. This article gave you five of the apps you can use to edit your screenshots without compromising the quality of your photos.
Δ
title: “How To Remove Scribbles On A Screenshot” ShowToc: true date: “2022-11-16” author: “Mathew Soto”
It’s especially annoying when the scribble on the screenshot is red. If your aim is to mask this, you’re going to struggle. With red drawings, you need to use a clone or stamp tool to get rid of them. You can use techniques like blurring because it’ll still be very obvious. A high-end photoshopping software such as Photoshop, getting rid of scribbles is typically accomplished by using the background to mask over the scribbles, resulting in the scribbles disappearing and appearing in the background or screenshot that you selected. If you don’t want to download apps on your Android or iPhone, then you can use an online tool like Photopea (free version of photoshop and you can use it online) which has a clone tool as well as a stamp tool which is all you need to remove scribbles on a screenshot.
How to Remove Scribbles On a Screenshot
1. Using TouchRetouch
It’s horrifying to discover a picture or screenshots that’s been viciously scribbled on, and, understandably, to feel there’s absolutely no hope of fixing it. Well, here’s where you’re wrong. By using the app ‘TouchRetouch,’ available on iOS and Android, you can remove scribbles and drawings on a picture of your choice. The TouchRetouch app will allow you to remove doodles on photos or screenshots on your Android device as well as your iPhone. Getting rid of scribbles can also be done on high-end photoshopping software such as Photoshop and it usually consists of you using the background to mask over the scribbles so that the scribbles disappear and looks like the background or another location of the photo or screenshot that you selected. The TouchRetouch, unfortunately, costs some small change. It’s $1.99 on the day this article was published. Tap ‘Buy’ and, after you confirm your payment method and any other needed information, it will automatically download and install the TouchRetouch app straight to your Android device.
- Choose the location of the screenshot you have a desire to alter or you can take your own.
- There’s several tools to use in the TouchRetouch app, like:
Brush Lasso Erase And Settings.
Each tool, obviously, does something different, however, the tools ‘Brush’ and ‘Lasso’ are the same tool only the way they’re use is different. For example, when you want to remove scribbles from a screenshot, you can either use a big brush and get the general area, or use the lasso tool for slightly more precision.
At any rate, the tool you want to use is the ‘Brush’ tool. Go ahead and select it. You’ll get the opportunity to adjust the size of your brush to the size you need. If it’s small scribblers, go for a smaller brush size. After you’ve select the Brush tool, take your finger and highlight the scribbles you want to erase.
When you’re satisfied with what you’ve highlighted, tap ‘GO’ and the TouchRetouch will remove the object. However, since removing the object leaves a void behind (since the textures were photographed behind the object) TouchRetouch will actually snag the surrounding textures and match the void to the surrounding textures as best as possible. In fact, if you aren’t satisfied with the retexture, you can retouch the photo as many times as you want.
2. Stamp Tool Photoshop
If the background of the rest of the picture and where the scribbles are is similar, then you can use the Stamp Tool. The Clone Stamp tool allows you to paint one part of an image over another part of the same image. To use the Clone Stamp tool, click and hold the rubber stamp icon in the toolbox and select Clone Stamp Tool in the flyout menu. From here, you can adjust the brush size and shape, flow, opacity, and blending modes.
3. Clone Tool In Photoshop
You can use the clone tool in Photoshop which will allow you to use one part of the screenshot to get rid of the scribbles. In Photoshop, the clone tool erases scribbles from pictures by using the information from one part of the image to replace another part of the image which would be the scribbles. To use the clone tool, select the Clone Stamp tool and position the cursor over the area you want to clone and then Alt-click (Windows) or Option-click (Mac) to define the clone source. Once defined, position the cursor over the scribbles so that you can start to paint the cloned pixels to get rid of the scribbled.
4. Gimp
Several digital tools are included in GIMP version 2.8 that may get used to define undesired sections of your image. You should click and drag your cursor around it to determine the region’s boundary you desire to isolate. A keyboard shortcut cuts or deletes the area you have selected, leaving a blank space for you to alter your visual message once it has been created. The Clone tool copies an image or pattern using the current brush as a template. Select the tool icon from the tool palette on the left-hand side of the screen. Clone, adjust the settings you find in the palette below to establish the size of the brush and hardness, then go to the image and pick a source area to be taken to “clone” it above the doodling, and then click on the clone button. Use the Ctrl key to choose the region to be copied, then click on the first piece of the scribble inside the snapshot to select it for copying. The technique has several applications, the most notable of which is fixing damaged regions in digital photographs by “painting over” them with pixel data from other photograph parts. It takes some time to master this method, but it may be pretty effective in the hands of an experienced practitioner.
5. Adobe Photoshop Lightroom
If you attempted to cover over a portion of a screenshot using the brush tool, the resulting region would be flat and devoid of any depth, tone, or shading. As a result, the painted area would be visible to the spectator. Adobe created the Clone Stamp tool in lightroom to allow for more nuanced picture manipulation. The Clone Stamp tool in Photoshop allows you to duplicate one portion of an image onto another section of the same picture. Photographers and designers frequently use the Clone Stamp tool to eliminate undesired components from photographs they have taken or designed. Using it, for example, you may disguise flaws on people’s faces by duplicating them from another section of their skin, or you can eliminate trees from a mountain vista by copying portions of the sky over them. The Clone Stamp allows you to paint with pixels that have been cloned from one piece of a picture and pasted onto another part of it. Consequently, the corrected region is virtually indistinguishable from the remainder of the image. As a result, if you know how to use one of the Clone Stamp’s descendant tools, you can use them all. It is especially true for the Pattern Stamp and Healing Brush, all descended from the Clone Stamp.
6. Adobe Photoshop Fix
Using Photoshop, it is often possible to remove doodles from screenshots and images; however, the operations’ complexity depends on where the mark to be removed is placed. For example, if it is over an area of a monochrome photograph, it will be easier to delete than above the subject. The most common cause for the Clone Stamp to cease operating is that the incorrect layer has gotten selected, which is the default. The improper layer selection in the Layers Panel may cause your edits to be concealed or the wrong sample used in your final image. The Clone Stamp tool in Photoshop Fix provides an even more effective method of copying a portion of a picture to another section of the same photo. Using your finger, press on the “source region” that you wish to replicate, and then drag it to another portion of the same picture with the brush tool.
7. Clip Studio Paint
Featuring a variety of helpful and distinctive features, Clip Studio Paint is a highly adaptable digital painting application that is great for rendering and inking work. It is simple to learn, and it comes with a large number of tools and unique brushes that allow you to paint and create any style of artwork you choose. Clip Studio Paint is the ultimate marriage of Adobe Photoshop and Paint Tool SAI. It is available for both Mac and Windows. It combines the most remarkable features of both programs for painters in a single package at the most competitive price. The tiny Paint Tool SAI application is less intimidating for beginning digital artists, and it is a beautiful beginner’s program for those just starting. Even though Clip Studio Paint is not designed for image editing, it has several ideal functions for cleaning up scans and pictures and preparing your images for printing.
8. inPixio Remove background
InPixio is a collection of independent apps that differ in specialized features and tools designed to deal with a particular photograph component. These tools assist in changing the backdrop of a photograph, removing unwanted parts from a picture, and creating beautiful collages. Suppose you are new to photography and need to quickly and easily enhance your images. In that case, InPixio is the perfect choice for you since it offers several simple-to-use features that eliminate distracting aspects from the picture, as well as a steady learning curve. Many options are available in InPixio, including light control (exposure, brightness, contrast) levels correction (curves, and color correction). Aside from that, the software offers a variety of frames and preset filters, textures, and effects, such as soft focus, noise reduction, and vignette. You can easily erase undesired information from a photograph without sacrificing image quality with the Erase feature. You have the option of deleting the highlighted zones or restoring the background. Editing the image is easier with the pick option that includes intelligent color detection. With its assistance, you may effortlessly take off any scribbles on your screenshot.
The Takeaway
You may find yourself having to share a screenshot that you would have scribbled on. Fortunately, it has become easy to remove any marks on pictures before you share them again. This article gave you five of the apps you can use to edit your screenshots without compromising the quality of your photos.
Δ
title: “How To Remove Scribbles On A Screenshot” ShowToc: true date: “2022-12-01” author: “Stuart Edwards”
It’s especially annoying when the scribble on the screenshot is red. If your aim is to mask this, you’re going to struggle. With red drawings, you need to use a clone or stamp tool to get rid of them. You can use techniques like blurring because it’ll still be very obvious. A high-end photoshopping software such as Photoshop, getting rid of scribbles is typically accomplished by using the background to mask over the scribbles, resulting in the scribbles disappearing and appearing in the background or screenshot that you selected. If you don’t want to download apps on your Android or iPhone, then you can use an online tool like Photopea (free version of photoshop and you can use it online) which has a clone tool as well as a stamp tool which is all you need to remove scribbles on a screenshot.
How to Remove Scribbles On a Screenshot
1. Using TouchRetouch
It’s horrifying to discover a picture or screenshots that’s been viciously scribbled on, and, understandably, to feel there’s absolutely no hope of fixing it. Well, here’s where you’re wrong. By using the app ‘TouchRetouch,’ available on iOS and Android, you can remove scribbles and drawings on a picture of your choice. The TouchRetouch app will allow you to remove doodles on photos or screenshots on your Android device as well as your iPhone. Getting rid of scribbles can also be done on high-end photoshopping software such as Photoshop and it usually consists of you using the background to mask over the scribbles so that the scribbles disappear and looks like the background or another location of the photo or screenshot that you selected. The TouchRetouch, unfortunately, costs some small change. It’s $1.99 on the day this article was published. Tap ‘Buy’ and, after you confirm your payment method and any other needed information, it will automatically download and install the TouchRetouch app straight to your Android device.
- Choose the location of the screenshot you have a desire to alter or you can take your own.
- There’s several tools to use in the TouchRetouch app, like:
Brush Lasso Erase And Settings.
Each tool, obviously, does something different, however, the tools ‘Brush’ and ‘Lasso’ are the same tool only the way they’re use is different. For example, when you want to remove scribbles from a screenshot, you can either use a big brush and get the general area, or use the lasso tool for slightly more precision.
At any rate, the tool you want to use is the ‘Brush’ tool. Go ahead and select it. You’ll get the opportunity to adjust the size of your brush to the size you need. If it’s small scribblers, go for a smaller brush size. After you’ve select the Brush tool, take your finger and highlight the scribbles you want to erase.
When you’re satisfied with what you’ve highlighted, tap ‘GO’ and the TouchRetouch will remove the object. However, since removing the object leaves a void behind (since the textures were photographed behind the object) TouchRetouch will actually snag the surrounding textures and match the void to the surrounding textures as best as possible. In fact, if you aren’t satisfied with the retexture, you can retouch the photo as many times as you want.
2. Stamp Tool Photoshop
If the background of the rest of the picture and where the scribbles are is similar, then you can use the Stamp Tool. The Clone Stamp tool allows you to paint one part of an image over another part of the same image. To use the Clone Stamp tool, click and hold the rubber stamp icon in the toolbox and select Clone Stamp Tool in the flyout menu. From here, you can adjust the brush size and shape, flow, opacity, and blending modes.
3. Clone Tool In Photoshop
You can use the clone tool in Photoshop which will allow you to use one part of the screenshot to get rid of the scribbles. In Photoshop, the clone tool erases scribbles from pictures by using the information from one part of the image to replace another part of the image which would be the scribbles. To use the clone tool, select the Clone Stamp tool and position the cursor over the area you want to clone and then Alt-click (Windows) or Option-click (Mac) to define the clone source. Once defined, position the cursor over the scribbles so that you can start to paint the cloned pixels to get rid of the scribbled.
4. Gimp
Several digital tools are included in GIMP version 2.8 that may get used to define undesired sections of your image. You should click and drag your cursor around it to determine the region’s boundary you desire to isolate. A keyboard shortcut cuts or deletes the area you have selected, leaving a blank space for you to alter your visual message once it has been created. The Clone tool copies an image or pattern using the current brush as a template. Select the tool icon from the tool palette on the left-hand side of the screen. Clone, adjust the settings you find in the palette below to establish the size of the brush and hardness, then go to the image and pick a source area to be taken to “clone” it above the doodling, and then click on the clone button. Use the Ctrl key to choose the region to be copied, then click on the first piece of the scribble inside the snapshot to select it for copying. The technique has several applications, the most notable of which is fixing damaged regions in digital photographs by “painting over” them with pixel data from other photograph parts. It takes some time to master this method, but it may be pretty effective in the hands of an experienced practitioner.
5. Adobe Photoshop Lightroom
If you attempted to cover over a portion of a screenshot using the brush tool, the resulting region would be flat and devoid of any depth, tone, or shading. As a result, the painted area would be visible to the spectator. Adobe created the Clone Stamp tool in lightroom to allow for more nuanced picture manipulation. The Clone Stamp tool in Photoshop allows you to duplicate one portion of an image onto another section of the same picture. Photographers and designers frequently use the Clone Stamp tool to eliminate undesired components from photographs they have taken or designed. Using it, for example, you may disguise flaws on people’s faces by duplicating them from another section of their skin, or you can eliminate trees from a mountain vista by copying portions of the sky over them. The Clone Stamp allows you to paint with pixels that have been cloned from one piece of a picture and pasted onto another part of it. Consequently, the corrected region is virtually indistinguishable from the remainder of the image. As a result, if you know how to use one of the Clone Stamp’s descendant tools, you can use them all. It is especially true for the Pattern Stamp and Healing Brush, all descended from the Clone Stamp.
6. Adobe Photoshop Fix
Using Photoshop, it is often possible to remove doodles from screenshots and images; however, the operations’ complexity depends on where the mark to be removed is placed. For example, if it is over an area of a monochrome photograph, it will be easier to delete than above the subject. The most common cause for the Clone Stamp to cease operating is that the incorrect layer has gotten selected, which is the default. The improper layer selection in the Layers Panel may cause your edits to be concealed or the wrong sample used in your final image. The Clone Stamp tool in Photoshop Fix provides an even more effective method of copying a portion of a picture to another section of the same photo. Using your finger, press on the “source region” that you wish to replicate, and then drag it to another portion of the same picture with the brush tool.
7. Clip Studio Paint
Featuring a variety of helpful and distinctive features, Clip Studio Paint is a highly adaptable digital painting application that is great for rendering and inking work. It is simple to learn, and it comes with a large number of tools and unique brushes that allow you to paint and create any style of artwork you choose. Clip Studio Paint is the ultimate marriage of Adobe Photoshop and Paint Tool SAI. It is available for both Mac and Windows. It combines the most remarkable features of both programs for painters in a single package at the most competitive price. The tiny Paint Tool SAI application is less intimidating for beginning digital artists, and it is a beautiful beginner’s program for those just starting. Even though Clip Studio Paint is not designed for image editing, it has several ideal functions for cleaning up scans and pictures and preparing your images for printing.
8. inPixio Remove background
InPixio is a collection of independent apps that differ in specialized features and tools designed to deal with a particular photograph component. These tools assist in changing the backdrop of a photograph, removing unwanted parts from a picture, and creating beautiful collages. Suppose you are new to photography and need to quickly and easily enhance your images. In that case, InPixio is the perfect choice for you since it offers several simple-to-use features that eliminate distracting aspects from the picture, as well as a steady learning curve. Many options are available in InPixio, including light control (exposure, brightness, contrast) levels correction (curves, and color correction). Aside from that, the software offers a variety of frames and preset filters, textures, and effects, such as soft focus, noise reduction, and vignette. You can easily erase undesired information from a photograph without sacrificing image quality with the Erase feature. You have the option of deleting the highlighted zones or restoring the background. Editing the image is easier with the pick option that includes intelligent color detection. With its assistance, you may effortlessly take off any scribbles on your screenshot.
The Takeaway
You may find yourself having to share a screenshot that you would have scribbled on. Fortunately, it has become easy to remove any marks on pictures before you share them again. This article gave you five of the apps you can use to edit your screenshots without compromising the quality of your photos.
Δ
title: “How To Remove Scribbles On A Screenshot” ShowToc: true date: “2022-10-20” author: “Brenda Sutphin”
It’s especially annoying when the scribble on the screenshot is red. If your aim is to mask this, you’re going to struggle. With red drawings, you need to use a clone or stamp tool to get rid of them. You can use techniques like blurring because it’ll still be very obvious. A high-end photoshopping software such as Photoshop, getting rid of scribbles is typically accomplished by using the background to mask over the scribbles, resulting in the scribbles disappearing and appearing in the background or screenshot that you selected. If you don’t want to download apps on your Android or iPhone, then you can use an online tool like Photopea (free version of photoshop and you can use it online) which has a clone tool as well as a stamp tool which is all you need to remove scribbles on a screenshot.
How to Remove Scribbles On a Screenshot
1. Using TouchRetouch
It’s horrifying to discover a picture or screenshots that’s been viciously scribbled on, and, understandably, to feel there’s absolutely no hope of fixing it. Well, here’s where you’re wrong. By using the app ‘TouchRetouch,’ available on iOS and Android, you can remove scribbles and drawings on a picture of your choice. The TouchRetouch app will allow you to remove doodles on photos or screenshots on your Android device as well as your iPhone. Getting rid of scribbles can also be done on high-end photoshopping software such as Photoshop and it usually consists of you using the background to mask over the scribbles so that the scribbles disappear and looks like the background or another location of the photo or screenshot that you selected. The TouchRetouch, unfortunately, costs some small change. It’s $1.99 on the day this article was published. Tap ‘Buy’ and, after you confirm your payment method and any other needed information, it will automatically download and install the TouchRetouch app straight to your Android device.
- Choose the location of the screenshot you have a desire to alter or you can take your own.
- There’s several tools to use in the TouchRetouch app, like:
Brush Lasso Erase And Settings.
Each tool, obviously, does something different, however, the tools ‘Brush’ and ‘Lasso’ are the same tool only the way they’re use is different. For example, when you want to remove scribbles from a screenshot, you can either use a big brush and get the general area, or use the lasso tool for slightly more precision.
At any rate, the tool you want to use is the ‘Brush’ tool. Go ahead and select it. You’ll get the opportunity to adjust the size of your brush to the size you need. If it’s small scribblers, go for a smaller brush size. After you’ve select the Brush tool, take your finger and highlight the scribbles you want to erase.
When you’re satisfied with what you’ve highlighted, tap ‘GO’ and the TouchRetouch will remove the object. However, since removing the object leaves a void behind (since the textures were photographed behind the object) TouchRetouch will actually snag the surrounding textures and match the void to the surrounding textures as best as possible. In fact, if you aren’t satisfied with the retexture, you can retouch the photo as many times as you want.
2. Stamp Tool Photoshop
If the background of the rest of the picture and where the scribbles are is similar, then you can use the Stamp Tool. The Clone Stamp tool allows you to paint one part of an image over another part of the same image. To use the Clone Stamp tool, click and hold the rubber stamp icon in the toolbox and select Clone Stamp Tool in the flyout menu. From here, you can adjust the brush size and shape, flow, opacity, and blending modes.
3. Clone Tool In Photoshop
You can use the clone tool in Photoshop which will allow you to use one part of the screenshot to get rid of the scribbles. In Photoshop, the clone tool erases scribbles from pictures by using the information from one part of the image to replace another part of the image which would be the scribbles. To use the clone tool, select the Clone Stamp tool and position the cursor over the area you want to clone and then Alt-click (Windows) or Option-click (Mac) to define the clone source. Once defined, position the cursor over the scribbles so that you can start to paint the cloned pixels to get rid of the scribbled.
4. Gimp
Several digital tools are included in GIMP version 2.8 that may get used to define undesired sections of your image. You should click and drag your cursor around it to determine the region’s boundary you desire to isolate. A keyboard shortcut cuts or deletes the area you have selected, leaving a blank space for you to alter your visual message once it has been created. The Clone tool copies an image or pattern using the current brush as a template. Select the tool icon from the tool palette on the left-hand side of the screen. Clone, adjust the settings you find in the palette below to establish the size of the brush and hardness, then go to the image and pick a source area to be taken to “clone” it above the doodling, and then click on the clone button. Use the Ctrl key to choose the region to be copied, then click on the first piece of the scribble inside the snapshot to select it for copying. The technique has several applications, the most notable of which is fixing damaged regions in digital photographs by “painting over” them with pixel data from other photograph parts. It takes some time to master this method, but it may be pretty effective in the hands of an experienced practitioner.
5. Adobe Photoshop Lightroom
If you attempted to cover over a portion of a screenshot using the brush tool, the resulting region would be flat and devoid of any depth, tone, or shading. As a result, the painted area would be visible to the spectator. Adobe created the Clone Stamp tool in lightroom to allow for more nuanced picture manipulation. The Clone Stamp tool in Photoshop allows you to duplicate one portion of an image onto another section of the same picture. Photographers and designers frequently use the Clone Stamp tool to eliminate undesired components from photographs they have taken or designed. Using it, for example, you may disguise flaws on people’s faces by duplicating them from another section of their skin, or you can eliminate trees from a mountain vista by copying portions of the sky over them. The Clone Stamp allows you to paint with pixels that have been cloned from one piece of a picture and pasted onto another part of it. Consequently, the corrected region is virtually indistinguishable from the remainder of the image. As a result, if you know how to use one of the Clone Stamp’s descendant tools, you can use them all. It is especially true for the Pattern Stamp and Healing Brush, all descended from the Clone Stamp.
6. Adobe Photoshop Fix
Using Photoshop, it is often possible to remove doodles from screenshots and images; however, the operations’ complexity depends on where the mark to be removed is placed. For example, if it is over an area of a monochrome photograph, it will be easier to delete than above the subject. The most common cause for the Clone Stamp to cease operating is that the incorrect layer has gotten selected, which is the default. The improper layer selection in the Layers Panel may cause your edits to be concealed or the wrong sample used in your final image. The Clone Stamp tool in Photoshop Fix provides an even more effective method of copying a portion of a picture to another section of the same photo. Using your finger, press on the “source region” that you wish to replicate, and then drag it to another portion of the same picture with the brush tool.
7. Clip Studio Paint
Featuring a variety of helpful and distinctive features, Clip Studio Paint is a highly adaptable digital painting application that is great for rendering and inking work. It is simple to learn, and it comes with a large number of tools and unique brushes that allow you to paint and create any style of artwork you choose. Clip Studio Paint is the ultimate marriage of Adobe Photoshop and Paint Tool SAI. It is available for both Mac and Windows. It combines the most remarkable features of both programs for painters in a single package at the most competitive price. The tiny Paint Tool SAI application is less intimidating for beginning digital artists, and it is a beautiful beginner’s program for those just starting. Even though Clip Studio Paint is not designed for image editing, it has several ideal functions for cleaning up scans and pictures and preparing your images for printing.
8. inPixio Remove background
InPixio is a collection of independent apps that differ in specialized features and tools designed to deal with a particular photograph component. These tools assist in changing the backdrop of a photograph, removing unwanted parts from a picture, and creating beautiful collages. Suppose you are new to photography and need to quickly and easily enhance your images. In that case, InPixio is the perfect choice for you since it offers several simple-to-use features that eliminate distracting aspects from the picture, as well as a steady learning curve. Many options are available in InPixio, including light control (exposure, brightness, contrast) levels correction (curves, and color correction). Aside from that, the software offers a variety of frames and preset filters, textures, and effects, such as soft focus, noise reduction, and vignette. You can easily erase undesired information from a photograph without sacrificing image quality with the Erase feature. You have the option of deleting the highlighted zones or restoring the background. Editing the image is easier with the pick option that includes intelligent color detection. With its assistance, you may effortlessly take off any scribbles on your screenshot.
The Takeaway
You may find yourself having to share a screenshot that you would have scribbled on. Fortunately, it has become easy to remove any marks on pictures before you share them again. This article gave you five of the apps you can use to edit your screenshots without compromising the quality of your photos.
Δ
title: “How To Remove Scribbles On A Screenshot” ShowToc: true date: “2022-11-04” author: “Bryan Pak”
It’s especially annoying when the scribble on the screenshot is red. If your aim is to mask this, you’re going to struggle. With red drawings, you need to use a clone or stamp tool to get rid of them. You can use techniques like blurring because it’ll still be very obvious. A high-end photoshopping software such as Photoshop, getting rid of scribbles is typically accomplished by using the background to mask over the scribbles, resulting in the scribbles disappearing and appearing in the background or screenshot that you selected. If you don’t want to download apps on your Android or iPhone, then you can use an online tool like Photopea (free version of photoshop and you can use it online) which has a clone tool as well as a stamp tool which is all you need to remove scribbles on a screenshot.
How to Remove Scribbles On a Screenshot
1. Using TouchRetouch
It’s horrifying to discover a picture or screenshots that’s been viciously scribbled on, and, understandably, to feel there’s absolutely no hope of fixing it. Well, here’s where you’re wrong. By using the app ‘TouchRetouch,’ available on iOS and Android, you can remove scribbles and drawings on a picture of your choice. The TouchRetouch app will allow you to remove doodles on photos or screenshots on your Android device as well as your iPhone. Getting rid of scribbles can also be done on high-end photoshopping software such as Photoshop and it usually consists of you using the background to mask over the scribbles so that the scribbles disappear and looks like the background or another location of the photo or screenshot that you selected. The TouchRetouch, unfortunately, costs some small change. It’s $1.99 on the day this article was published. Tap ‘Buy’ and, after you confirm your payment method and any other needed information, it will automatically download and install the TouchRetouch app straight to your Android device.
- Choose the location of the screenshot you have a desire to alter or you can take your own.
- There’s several tools to use in the TouchRetouch app, like:
Brush Lasso Erase And Settings.
Each tool, obviously, does something different, however, the tools ‘Brush’ and ‘Lasso’ are the same tool only the way they’re use is different. For example, when you want to remove scribbles from a screenshot, you can either use a big brush and get the general area, or use the lasso tool for slightly more precision.
At any rate, the tool you want to use is the ‘Brush’ tool. Go ahead and select it. You’ll get the opportunity to adjust the size of your brush to the size you need. If it’s small scribblers, go for a smaller brush size. After you’ve select the Brush tool, take your finger and highlight the scribbles you want to erase.
When you’re satisfied with what you’ve highlighted, tap ‘GO’ and the TouchRetouch will remove the object. However, since removing the object leaves a void behind (since the textures were photographed behind the object) TouchRetouch will actually snag the surrounding textures and match the void to the surrounding textures as best as possible. In fact, if you aren’t satisfied with the retexture, you can retouch the photo as many times as you want.
2. Stamp Tool Photoshop
If the background of the rest of the picture and where the scribbles are is similar, then you can use the Stamp Tool. The Clone Stamp tool allows you to paint one part of an image over another part of the same image. To use the Clone Stamp tool, click and hold the rubber stamp icon in the toolbox and select Clone Stamp Tool in the flyout menu. From here, you can adjust the brush size and shape, flow, opacity, and blending modes.
3. Clone Tool In Photoshop
You can use the clone tool in Photoshop which will allow you to use one part of the screenshot to get rid of the scribbles. In Photoshop, the clone tool erases scribbles from pictures by using the information from one part of the image to replace another part of the image which would be the scribbles. To use the clone tool, select the Clone Stamp tool and position the cursor over the area you want to clone and then Alt-click (Windows) or Option-click (Mac) to define the clone source. Once defined, position the cursor over the scribbles so that you can start to paint the cloned pixels to get rid of the scribbled.
4. Gimp
Several digital tools are included in GIMP version 2.8 that may get used to define undesired sections of your image. You should click and drag your cursor around it to determine the region’s boundary you desire to isolate. A keyboard shortcut cuts or deletes the area you have selected, leaving a blank space for you to alter your visual message once it has been created. The Clone tool copies an image or pattern using the current brush as a template. Select the tool icon from the tool palette on the left-hand side of the screen. Clone, adjust the settings you find in the palette below to establish the size of the brush and hardness, then go to the image and pick a source area to be taken to “clone” it above the doodling, and then click on the clone button. Use the Ctrl key to choose the region to be copied, then click on the first piece of the scribble inside the snapshot to select it for copying. The technique has several applications, the most notable of which is fixing damaged regions in digital photographs by “painting over” them with pixel data from other photograph parts. It takes some time to master this method, but it may be pretty effective in the hands of an experienced practitioner.
5. Adobe Photoshop Lightroom
If you attempted to cover over a portion of a screenshot using the brush tool, the resulting region would be flat and devoid of any depth, tone, or shading. As a result, the painted area would be visible to the spectator. Adobe created the Clone Stamp tool in lightroom to allow for more nuanced picture manipulation. The Clone Stamp tool in Photoshop allows you to duplicate one portion of an image onto another section of the same picture. Photographers and designers frequently use the Clone Stamp tool to eliminate undesired components from photographs they have taken or designed. Using it, for example, you may disguise flaws on people’s faces by duplicating them from another section of their skin, or you can eliminate trees from a mountain vista by copying portions of the sky over them. The Clone Stamp allows you to paint with pixels that have been cloned from one piece of a picture and pasted onto another part of it. Consequently, the corrected region is virtually indistinguishable from the remainder of the image. As a result, if you know how to use one of the Clone Stamp’s descendant tools, you can use them all. It is especially true for the Pattern Stamp and Healing Brush, all descended from the Clone Stamp.
6. Adobe Photoshop Fix
Using Photoshop, it is often possible to remove doodles from screenshots and images; however, the operations’ complexity depends on where the mark to be removed is placed. For example, if it is over an area of a monochrome photograph, it will be easier to delete than above the subject. The most common cause for the Clone Stamp to cease operating is that the incorrect layer has gotten selected, which is the default. The improper layer selection in the Layers Panel may cause your edits to be concealed or the wrong sample used in your final image. The Clone Stamp tool in Photoshop Fix provides an even more effective method of copying a portion of a picture to another section of the same photo. Using your finger, press on the “source region” that you wish to replicate, and then drag it to another portion of the same picture with the brush tool.
7. Clip Studio Paint
Featuring a variety of helpful and distinctive features, Clip Studio Paint is a highly adaptable digital painting application that is great for rendering and inking work. It is simple to learn, and it comes with a large number of tools and unique brushes that allow you to paint and create any style of artwork you choose. Clip Studio Paint is the ultimate marriage of Adobe Photoshop and Paint Tool SAI. It is available for both Mac and Windows. It combines the most remarkable features of both programs for painters in a single package at the most competitive price. The tiny Paint Tool SAI application is less intimidating for beginning digital artists, and it is a beautiful beginner’s program for those just starting. Even though Clip Studio Paint is not designed for image editing, it has several ideal functions for cleaning up scans and pictures and preparing your images for printing.
8. inPixio Remove background
InPixio is a collection of independent apps that differ in specialized features and tools designed to deal with a particular photograph component. These tools assist in changing the backdrop of a photograph, removing unwanted parts from a picture, and creating beautiful collages. Suppose you are new to photography and need to quickly and easily enhance your images. In that case, InPixio is the perfect choice for you since it offers several simple-to-use features that eliminate distracting aspects from the picture, as well as a steady learning curve. Many options are available in InPixio, including light control (exposure, brightness, contrast) levels correction (curves, and color correction). Aside from that, the software offers a variety of frames and preset filters, textures, and effects, such as soft focus, noise reduction, and vignette. You can easily erase undesired information from a photograph without sacrificing image quality with the Erase feature. You have the option of deleting the highlighted zones or restoring the background. Editing the image is easier with the pick option that includes intelligent color detection. With its assistance, you may effortlessly take off any scribbles on your screenshot.
The Takeaway
You may find yourself having to share a screenshot that you would have scribbled on. Fortunately, it has become easy to remove any marks on pictures before you share them again. This article gave you five of the apps you can use to edit your screenshots without compromising the quality of your photos.
Δ
title: “How To Remove Scribbles On A Screenshot” ShowToc: true date: “2022-10-19” author: “Anthony Steinmetz”
It’s especially annoying when the scribble on the screenshot is red. If your aim is to mask this, you’re going to struggle. With red drawings, you need to use a clone or stamp tool to get rid of them. You can use techniques like blurring because it’ll still be very obvious. A high-end photoshopping software such as Photoshop, getting rid of scribbles is typically accomplished by using the background to mask over the scribbles, resulting in the scribbles disappearing and appearing in the background or screenshot that you selected. If you don’t want to download apps on your Android or iPhone, then you can use an online tool like Photopea (free version of photoshop and you can use it online) which has a clone tool as well as a stamp tool which is all you need to remove scribbles on a screenshot.
How to Remove Scribbles On a Screenshot
1. Using TouchRetouch
It’s horrifying to discover a picture or screenshots that’s been viciously scribbled on, and, understandably, to feel there’s absolutely no hope of fixing it. Well, here’s where you’re wrong. By using the app ‘TouchRetouch,’ available on iOS and Android, you can remove scribbles and drawings on a picture of your choice. The TouchRetouch app will allow you to remove doodles on photos or screenshots on your Android device as well as your iPhone. Getting rid of scribbles can also be done on high-end photoshopping software such as Photoshop and it usually consists of you using the background to mask over the scribbles so that the scribbles disappear and looks like the background or another location of the photo or screenshot that you selected. The TouchRetouch, unfortunately, costs some small change. It’s $1.99 on the day this article was published. Tap ‘Buy’ and, after you confirm your payment method and any other needed information, it will automatically download and install the TouchRetouch app straight to your Android device.
- Choose the location of the screenshot you have a desire to alter or you can take your own.
- There’s several tools to use in the TouchRetouch app, like:
Brush Lasso Erase And Settings.
Each tool, obviously, does something different, however, the tools ‘Brush’ and ‘Lasso’ are the same tool only the way they’re use is different. For example, when you want to remove scribbles from a screenshot, you can either use a big brush and get the general area, or use the lasso tool for slightly more precision.
At any rate, the tool you want to use is the ‘Brush’ tool. Go ahead and select it. You’ll get the opportunity to adjust the size of your brush to the size you need. If it’s small scribblers, go for a smaller brush size. After you’ve select the Brush tool, take your finger and highlight the scribbles you want to erase.
When you’re satisfied with what you’ve highlighted, tap ‘GO’ and the TouchRetouch will remove the object. However, since removing the object leaves a void behind (since the textures were photographed behind the object) TouchRetouch will actually snag the surrounding textures and match the void to the surrounding textures as best as possible. In fact, if you aren’t satisfied with the retexture, you can retouch the photo as many times as you want.
2. Stamp Tool Photoshop
If the background of the rest of the picture and where the scribbles are is similar, then you can use the Stamp Tool. The Clone Stamp tool allows you to paint one part of an image over another part of the same image. To use the Clone Stamp tool, click and hold the rubber stamp icon in the toolbox and select Clone Stamp Tool in the flyout menu. From here, you can adjust the brush size and shape, flow, opacity, and blending modes.
3. Clone Tool In Photoshop
You can use the clone tool in Photoshop which will allow you to use one part of the screenshot to get rid of the scribbles. In Photoshop, the clone tool erases scribbles from pictures by using the information from one part of the image to replace another part of the image which would be the scribbles. To use the clone tool, select the Clone Stamp tool and position the cursor over the area you want to clone and then Alt-click (Windows) or Option-click (Mac) to define the clone source. Once defined, position the cursor over the scribbles so that you can start to paint the cloned pixels to get rid of the scribbled.
4. Gimp
Several digital tools are included in GIMP version 2.8 that may get used to define undesired sections of your image. You should click and drag your cursor around it to determine the region’s boundary you desire to isolate. A keyboard shortcut cuts or deletes the area you have selected, leaving a blank space for you to alter your visual message once it has been created. The Clone tool copies an image or pattern using the current brush as a template. Select the tool icon from the tool palette on the left-hand side of the screen. Clone, adjust the settings you find in the palette below to establish the size of the brush and hardness, then go to the image and pick a source area to be taken to “clone” it above the doodling, and then click on the clone button. Use the Ctrl key to choose the region to be copied, then click on the first piece of the scribble inside the snapshot to select it for copying. The technique has several applications, the most notable of which is fixing damaged regions in digital photographs by “painting over” them with pixel data from other photograph parts. It takes some time to master this method, but it may be pretty effective in the hands of an experienced practitioner.
5. Adobe Photoshop Lightroom
If you attempted to cover over a portion of a screenshot using the brush tool, the resulting region would be flat and devoid of any depth, tone, or shading. As a result, the painted area would be visible to the spectator. Adobe created the Clone Stamp tool in lightroom to allow for more nuanced picture manipulation. The Clone Stamp tool in Photoshop allows you to duplicate one portion of an image onto another section of the same picture. Photographers and designers frequently use the Clone Stamp tool to eliminate undesired components from photographs they have taken or designed. Using it, for example, you may disguise flaws on people’s faces by duplicating them from another section of their skin, or you can eliminate trees from a mountain vista by copying portions of the sky over them. The Clone Stamp allows you to paint with pixels that have been cloned from one piece of a picture and pasted onto another part of it. Consequently, the corrected region is virtually indistinguishable from the remainder of the image. As a result, if you know how to use one of the Clone Stamp’s descendant tools, you can use them all. It is especially true for the Pattern Stamp and Healing Brush, all descended from the Clone Stamp.
6. Adobe Photoshop Fix
Using Photoshop, it is often possible to remove doodles from screenshots and images; however, the operations’ complexity depends on where the mark to be removed is placed. For example, if it is over an area of a monochrome photograph, it will be easier to delete than above the subject. The most common cause for the Clone Stamp to cease operating is that the incorrect layer has gotten selected, which is the default. The improper layer selection in the Layers Panel may cause your edits to be concealed or the wrong sample used in your final image. The Clone Stamp tool in Photoshop Fix provides an even more effective method of copying a portion of a picture to another section of the same photo. Using your finger, press on the “source region” that you wish to replicate, and then drag it to another portion of the same picture with the brush tool.
7. Clip Studio Paint
Featuring a variety of helpful and distinctive features, Clip Studio Paint is a highly adaptable digital painting application that is great for rendering and inking work. It is simple to learn, and it comes with a large number of tools and unique brushes that allow you to paint and create any style of artwork you choose. Clip Studio Paint is the ultimate marriage of Adobe Photoshop and Paint Tool SAI. It is available for both Mac and Windows. It combines the most remarkable features of both programs for painters in a single package at the most competitive price. The tiny Paint Tool SAI application is less intimidating for beginning digital artists, and it is a beautiful beginner’s program for those just starting. Even though Clip Studio Paint is not designed for image editing, it has several ideal functions for cleaning up scans and pictures and preparing your images for printing.
8. inPixio Remove background
InPixio is a collection of independent apps that differ in specialized features and tools designed to deal with a particular photograph component. These tools assist in changing the backdrop of a photograph, removing unwanted parts from a picture, and creating beautiful collages. Suppose you are new to photography and need to quickly and easily enhance your images. In that case, InPixio is the perfect choice for you since it offers several simple-to-use features that eliminate distracting aspects from the picture, as well as a steady learning curve. Many options are available in InPixio, including light control (exposure, brightness, contrast) levels correction (curves, and color correction). Aside from that, the software offers a variety of frames and preset filters, textures, and effects, such as soft focus, noise reduction, and vignette. You can easily erase undesired information from a photograph without sacrificing image quality with the Erase feature. You have the option of deleting the highlighted zones or restoring the background. Editing the image is easier with the pick option that includes intelligent color detection. With its assistance, you may effortlessly take off any scribbles on your screenshot.
The Takeaway
You may find yourself having to share a screenshot that you would have scribbled on. Fortunately, it has become easy to remove any marks on pictures before you share them again. This article gave you five of the apps you can use to edit your screenshots without compromising the quality of your photos.
Δ
title: “How To Remove Scribbles On A Screenshot” ShowToc: true date: “2022-12-09” author: “Jon Gorman”
It’s especially annoying when the scribble on the screenshot is red. If your aim is to mask this, you’re going to struggle. With red drawings, you need to use a clone or stamp tool to get rid of them. You can use techniques like blurring because it’ll still be very obvious. A high-end photoshopping software such as Photoshop, getting rid of scribbles is typically accomplished by using the background to mask over the scribbles, resulting in the scribbles disappearing and appearing in the background or screenshot that you selected. If you don’t want to download apps on your Android or iPhone, then you can use an online tool like Photopea (free version of photoshop and you can use it online) which has a clone tool as well as a stamp tool which is all you need to remove scribbles on a screenshot.
How to Remove Scribbles On a Screenshot
1. Using TouchRetouch
It’s horrifying to discover a picture or screenshots that’s been viciously scribbled on, and, understandably, to feel there’s absolutely no hope of fixing it. Well, here’s where you’re wrong. By using the app ‘TouchRetouch,’ available on iOS and Android, you can remove scribbles and drawings on a picture of your choice. The TouchRetouch app will allow you to remove doodles on photos or screenshots on your Android device as well as your iPhone. Getting rid of scribbles can also be done on high-end photoshopping software such as Photoshop and it usually consists of you using the background to mask over the scribbles so that the scribbles disappear and looks like the background or another location of the photo or screenshot that you selected. The TouchRetouch, unfortunately, costs some small change. It’s $1.99 on the day this article was published. Tap ‘Buy’ and, after you confirm your payment method and any other needed information, it will automatically download and install the TouchRetouch app straight to your Android device.
- Choose the location of the screenshot you have a desire to alter or you can take your own.
- There’s several tools to use in the TouchRetouch app, like:
Brush Lasso Erase And Settings.
Each tool, obviously, does something different, however, the tools ‘Brush’ and ‘Lasso’ are the same tool only the way they’re use is different. For example, when you want to remove scribbles from a screenshot, you can either use a big brush and get the general area, or use the lasso tool for slightly more precision.
At any rate, the tool you want to use is the ‘Brush’ tool. Go ahead and select it. You’ll get the opportunity to adjust the size of your brush to the size you need. If it’s small scribblers, go for a smaller brush size. After you’ve select the Brush tool, take your finger and highlight the scribbles you want to erase.
When you’re satisfied with what you’ve highlighted, tap ‘GO’ and the TouchRetouch will remove the object. However, since removing the object leaves a void behind (since the textures were photographed behind the object) TouchRetouch will actually snag the surrounding textures and match the void to the surrounding textures as best as possible. In fact, if you aren’t satisfied with the retexture, you can retouch the photo as many times as you want.
2. Stamp Tool Photoshop
If the background of the rest of the picture and where the scribbles are is similar, then you can use the Stamp Tool. The Clone Stamp tool allows you to paint one part of an image over another part of the same image. To use the Clone Stamp tool, click and hold the rubber stamp icon in the toolbox and select Clone Stamp Tool in the flyout menu. From here, you can adjust the brush size and shape, flow, opacity, and blending modes.
3. Clone Tool In Photoshop
You can use the clone tool in Photoshop which will allow you to use one part of the screenshot to get rid of the scribbles. In Photoshop, the clone tool erases scribbles from pictures by using the information from one part of the image to replace another part of the image which would be the scribbles. To use the clone tool, select the Clone Stamp tool and position the cursor over the area you want to clone and then Alt-click (Windows) or Option-click (Mac) to define the clone source. Once defined, position the cursor over the scribbles so that you can start to paint the cloned pixels to get rid of the scribbled.
4. Gimp
Several digital tools are included in GIMP version 2.8 that may get used to define undesired sections of your image. You should click and drag your cursor around it to determine the region’s boundary you desire to isolate. A keyboard shortcut cuts or deletes the area you have selected, leaving a blank space for you to alter your visual message once it has been created. The Clone tool copies an image or pattern using the current brush as a template. Select the tool icon from the tool palette on the left-hand side of the screen. Clone, adjust the settings you find in the palette below to establish the size of the brush and hardness, then go to the image and pick a source area to be taken to “clone” it above the doodling, and then click on the clone button. Use the Ctrl key to choose the region to be copied, then click on the first piece of the scribble inside the snapshot to select it for copying. The technique has several applications, the most notable of which is fixing damaged regions in digital photographs by “painting over” them with pixel data from other photograph parts. It takes some time to master this method, but it may be pretty effective in the hands of an experienced practitioner.
5. Adobe Photoshop Lightroom
If you attempted to cover over a portion of a screenshot using the brush tool, the resulting region would be flat and devoid of any depth, tone, or shading. As a result, the painted area would be visible to the spectator. Adobe created the Clone Stamp tool in lightroom to allow for more nuanced picture manipulation. The Clone Stamp tool in Photoshop allows you to duplicate one portion of an image onto another section of the same picture. Photographers and designers frequently use the Clone Stamp tool to eliminate undesired components from photographs they have taken or designed. Using it, for example, you may disguise flaws on people’s faces by duplicating them from another section of their skin, or you can eliminate trees from a mountain vista by copying portions of the sky over them. The Clone Stamp allows you to paint with pixels that have been cloned from one piece of a picture and pasted onto another part of it. Consequently, the corrected region is virtually indistinguishable from the remainder of the image. As a result, if you know how to use one of the Clone Stamp’s descendant tools, you can use them all. It is especially true for the Pattern Stamp and Healing Brush, all descended from the Clone Stamp.
6. Adobe Photoshop Fix
Using Photoshop, it is often possible to remove doodles from screenshots and images; however, the operations’ complexity depends on where the mark to be removed is placed. For example, if it is over an area of a monochrome photograph, it will be easier to delete than above the subject. The most common cause for the Clone Stamp to cease operating is that the incorrect layer has gotten selected, which is the default. The improper layer selection in the Layers Panel may cause your edits to be concealed or the wrong sample used in your final image. The Clone Stamp tool in Photoshop Fix provides an even more effective method of copying a portion of a picture to another section of the same photo. Using your finger, press on the “source region” that you wish to replicate, and then drag it to another portion of the same picture with the brush tool.
7. Clip Studio Paint
Featuring a variety of helpful and distinctive features, Clip Studio Paint is a highly adaptable digital painting application that is great for rendering and inking work. It is simple to learn, and it comes with a large number of tools and unique brushes that allow you to paint and create any style of artwork you choose. Clip Studio Paint is the ultimate marriage of Adobe Photoshop and Paint Tool SAI. It is available for both Mac and Windows. It combines the most remarkable features of both programs for painters in a single package at the most competitive price. The tiny Paint Tool SAI application is less intimidating for beginning digital artists, and it is a beautiful beginner’s program for those just starting. Even though Clip Studio Paint is not designed for image editing, it has several ideal functions for cleaning up scans and pictures and preparing your images for printing.
8. inPixio Remove background
InPixio is a collection of independent apps that differ in specialized features and tools designed to deal with a particular photograph component. These tools assist in changing the backdrop of a photograph, removing unwanted parts from a picture, and creating beautiful collages. Suppose you are new to photography and need to quickly and easily enhance your images. In that case, InPixio is the perfect choice for you since it offers several simple-to-use features that eliminate distracting aspects from the picture, as well as a steady learning curve. Many options are available in InPixio, including light control (exposure, brightness, contrast) levels correction (curves, and color correction). Aside from that, the software offers a variety of frames and preset filters, textures, and effects, such as soft focus, noise reduction, and vignette. You can easily erase undesired information from a photograph without sacrificing image quality with the Erase feature. You have the option of deleting the highlighted zones or restoring the background. Editing the image is easier with the pick option that includes intelligent color detection. With its assistance, you may effortlessly take off any scribbles on your screenshot.
The Takeaway
You may find yourself having to share a screenshot that you would have scribbled on. Fortunately, it has become easy to remove any marks on pictures before you share them again. This article gave you five of the apps you can use to edit your screenshots without compromising the quality of your photos.
Δ
title: “How To Remove Scribbles On A Screenshot” ShowToc: true date: “2022-11-17” author: “Jimmy He”
It’s especially annoying when the scribble on the screenshot is red. If your aim is to mask this, you’re going to struggle. With red drawings, you need to use a clone or stamp tool to get rid of them. You can use techniques like blurring because it’ll still be very obvious. A high-end photoshopping software such as Photoshop, getting rid of scribbles is typically accomplished by using the background to mask over the scribbles, resulting in the scribbles disappearing and appearing in the background or screenshot that you selected. If you don’t want to download apps on your Android or iPhone, then you can use an online tool like Photopea (free version of photoshop and you can use it online) which has a clone tool as well as a stamp tool which is all you need to remove scribbles on a screenshot.
How to Remove Scribbles On a Screenshot
1. Using TouchRetouch
It’s horrifying to discover a picture or screenshots that’s been viciously scribbled on, and, understandably, to feel there’s absolutely no hope of fixing it. Well, here’s where you’re wrong. By using the app ‘TouchRetouch,’ available on iOS and Android, you can remove scribbles and drawings on a picture of your choice. The TouchRetouch app will allow you to remove doodles on photos or screenshots on your Android device as well as your iPhone. Getting rid of scribbles can also be done on high-end photoshopping software such as Photoshop and it usually consists of you using the background to mask over the scribbles so that the scribbles disappear and looks like the background or another location of the photo or screenshot that you selected. The TouchRetouch, unfortunately, costs some small change. It’s $1.99 on the day this article was published. Tap ‘Buy’ and, after you confirm your payment method and any other needed information, it will automatically download and install the TouchRetouch app straight to your Android device.
- Choose the location of the screenshot you have a desire to alter or you can take your own.
- There’s several tools to use in the TouchRetouch app, like:
Brush Lasso Erase And Settings.
Each tool, obviously, does something different, however, the tools ‘Brush’ and ‘Lasso’ are the same tool only the way they’re use is different. For example, when you want to remove scribbles from a screenshot, you can either use a big brush and get the general area, or use the lasso tool for slightly more precision.
At any rate, the tool you want to use is the ‘Brush’ tool. Go ahead and select it. You’ll get the opportunity to adjust the size of your brush to the size you need. If it’s small scribblers, go for a smaller brush size. After you’ve select the Brush tool, take your finger and highlight the scribbles you want to erase.
When you’re satisfied with what you’ve highlighted, tap ‘GO’ and the TouchRetouch will remove the object. However, since removing the object leaves a void behind (since the textures were photographed behind the object) TouchRetouch will actually snag the surrounding textures and match the void to the surrounding textures as best as possible. In fact, if you aren’t satisfied with the retexture, you can retouch the photo as many times as you want.
2. Stamp Tool Photoshop
If the background of the rest of the picture and where the scribbles are is similar, then you can use the Stamp Tool. The Clone Stamp tool allows you to paint one part of an image over another part of the same image. To use the Clone Stamp tool, click and hold the rubber stamp icon in the toolbox and select Clone Stamp Tool in the flyout menu. From here, you can adjust the brush size and shape, flow, opacity, and blending modes.
3. Clone Tool In Photoshop
You can use the clone tool in Photoshop which will allow you to use one part of the screenshot to get rid of the scribbles. In Photoshop, the clone tool erases scribbles from pictures by using the information from one part of the image to replace another part of the image which would be the scribbles. To use the clone tool, select the Clone Stamp tool and position the cursor over the area you want to clone and then Alt-click (Windows) or Option-click (Mac) to define the clone source. Once defined, position the cursor over the scribbles so that you can start to paint the cloned pixels to get rid of the scribbled.
4. Gimp
Several digital tools are included in GIMP version 2.8 that may get used to define undesired sections of your image. You should click and drag your cursor around it to determine the region’s boundary you desire to isolate. A keyboard shortcut cuts or deletes the area you have selected, leaving a blank space for you to alter your visual message once it has been created. The Clone tool copies an image or pattern using the current brush as a template. Select the tool icon from the tool palette on the left-hand side of the screen. Clone, adjust the settings you find in the palette below to establish the size of the brush and hardness, then go to the image and pick a source area to be taken to “clone” it above the doodling, and then click on the clone button. Use the Ctrl key to choose the region to be copied, then click on the first piece of the scribble inside the snapshot to select it for copying. The technique has several applications, the most notable of which is fixing damaged regions in digital photographs by “painting over” them with pixel data from other photograph parts. It takes some time to master this method, but it may be pretty effective in the hands of an experienced practitioner.
5. Adobe Photoshop Lightroom
If you attempted to cover over a portion of a screenshot using the brush tool, the resulting region would be flat and devoid of any depth, tone, or shading. As a result, the painted area would be visible to the spectator. Adobe created the Clone Stamp tool in lightroom to allow for more nuanced picture manipulation. The Clone Stamp tool in Photoshop allows you to duplicate one portion of an image onto another section of the same picture. Photographers and designers frequently use the Clone Stamp tool to eliminate undesired components from photographs they have taken or designed. Using it, for example, you may disguise flaws on people’s faces by duplicating them from another section of their skin, or you can eliminate trees from a mountain vista by copying portions of the sky over them. The Clone Stamp allows you to paint with pixels that have been cloned from one piece of a picture and pasted onto another part of it. Consequently, the corrected region is virtually indistinguishable from the remainder of the image. As a result, if you know how to use one of the Clone Stamp’s descendant tools, you can use them all. It is especially true for the Pattern Stamp and Healing Brush, all descended from the Clone Stamp.
6. Adobe Photoshop Fix
Using Photoshop, it is often possible to remove doodles from screenshots and images; however, the operations’ complexity depends on where the mark to be removed is placed. For example, if it is over an area of a monochrome photograph, it will be easier to delete than above the subject. The most common cause for the Clone Stamp to cease operating is that the incorrect layer has gotten selected, which is the default. The improper layer selection in the Layers Panel may cause your edits to be concealed or the wrong sample used in your final image. The Clone Stamp tool in Photoshop Fix provides an even more effective method of copying a portion of a picture to another section of the same photo. Using your finger, press on the “source region” that you wish to replicate, and then drag it to another portion of the same picture with the brush tool.
7. Clip Studio Paint
Featuring a variety of helpful and distinctive features, Clip Studio Paint is a highly adaptable digital painting application that is great for rendering and inking work. It is simple to learn, and it comes with a large number of tools and unique brushes that allow you to paint and create any style of artwork you choose. Clip Studio Paint is the ultimate marriage of Adobe Photoshop and Paint Tool SAI. It is available for both Mac and Windows. It combines the most remarkable features of both programs for painters in a single package at the most competitive price. The tiny Paint Tool SAI application is less intimidating for beginning digital artists, and it is a beautiful beginner’s program for those just starting. Even though Clip Studio Paint is not designed for image editing, it has several ideal functions for cleaning up scans and pictures and preparing your images for printing.
8. inPixio Remove background
InPixio is a collection of independent apps that differ in specialized features and tools designed to deal with a particular photograph component. These tools assist in changing the backdrop of a photograph, removing unwanted parts from a picture, and creating beautiful collages. Suppose you are new to photography and need to quickly and easily enhance your images. In that case, InPixio is the perfect choice for you since it offers several simple-to-use features that eliminate distracting aspects from the picture, as well as a steady learning curve. Many options are available in InPixio, including light control (exposure, brightness, contrast) levels correction (curves, and color correction). Aside from that, the software offers a variety of frames and preset filters, textures, and effects, such as soft focus, noise reduction, and vignette. You can easily erase undesired information from a photograph without sacrificing image quality with the Erase feature. You have the option of deleting the highlighted zones or restoring the background. Editing the image is easier with the pick option that includes intelligent color detection. With its assistance, you may effortlessly take off any scribbles on your screenshot.
The Takeaway
You may find yourself having to share a screenshot that you would have scribbled on. Fortunately, it has become easy to remove any marks on pictures before you share them again. This article gave you five of the apps you can use to edit your screenshots without compromising the quality of your photos.
Δ
title: “How To Remove Scribbles On A Screenshot” ShowToc: true date: “2022-12-16” author: “Henry Clark”
It’s especially annoying when the scribble on the screenshot is red. If your aim is to mask this, you’re going to struggle. With red drawings, you need to use a clone or stamp tool to get rid of them. You can use techniques like blurring because it’ll still be very obvious. A high-end photoshopping software such as Photoshop, getting rid of scribbles is typically accomplished by using the background to mask over the scribbles, resulting in the scribbles disappearing and appearing in the background or screenshot that you selected. If you don’t want to download apps on your Android or iPhone, then you can use an online tool like Photopea (free version of photoshop and you can use it online) which has a clone tool as well as a stamp tool which is all you need to remove scribbles on a screenshot.
How to Remove Scribbles On a Screenshot
1. Using TouchRetouch
It’s horrifying to discover a picture or screenshots that’s been viciously scribbled on, and, understandably, to feel there’s absolutely no hope of fixing it. Well, here’s where you’re wrong. By using the app ‘TouchRetouch,’ available on iOS and Android, you can remove scribbles and drawings on a picture of your choice. The TouchRetouch app will allow you to remove doodles on photos or screenshots on your Android device as well as your iPhone. Getting rid of scribbles can also be done on high-end photoshopping software such as Photoshop and it usually consists of you using the background to mask over the scribbles so that the scribbles disappear and looks like the background or another location of the photo or screenshot that you selected. The TouchRetouch, unfortunately, costs some small change. It’s $1.99 on the day this article was published. Tap ‘Buy’ and, after you confirm your payment method and any other needed information, it will automatically download and install the TouchRetouch app straight to your Android device.
- Choose the location of the screenshot you have a desire to alter or you can take your own.
- There’s several tools to use in the TouchRetouch app, like:
Brush Lasso Erase And Settings.
Each tool, obviously, does something different, however, the tools ‘Brush’ and ‘Lasso’ are the same tool only the way they’re use is different. For example, when you want to remove scribbles from a screenshot, you can either use a big brush and get the general area, or use the lasso tool for slightly more precision.
At any rate, the tool you want to use is the ‘Brush’ tool. Go ahead and select it. You’ll get the opportunity to adjust the size of your brush to the size you need. If it’s small scribblers, go for a smaller brush size. After you’ve select the Brush tool, take your finger and highlight the scribbles you want to erase.
When you’re satisfied with what you’ve highlighted, tap ‘GO’ and the TouchRetouch will remove the object. However, since removing the object leaves a void behind (since the textures were photographed behind the object) TouchRetouch will actually snag the surrounding textures and match the void to the surrounding textures as best as possible. In fact, if you aren’t satisfied with the retexture, you can retouch the photo as many times as you want.
2. Stamp Tool Photoshop
If the background of the rest of the picture and where the scribbles are is similar, then you can use the Stamp Tool. The Clone Stamp tool allows you to paint one part of an image over another part of the same image. To use the Clone Stamp tool, click and hold the rubber stamp icon in the toolbox and select Clone Stamp Tool in the flyout menu. From here, you can adjust the brush size and shape, flow, opacity, and blending modes.
3. Clone Tool In Photoshop
You can use the clone tool in Photoshop which will allow you to use one part of the screenshot to get rid of the scribbles. In Photoshop, the clone tool erases scribbles from pictures by using the information from one part of the image to replace another part of the image which would be the scribbles. To use the clone tool, select the Clone Stamp tool and position the cursor over the area you want to clone and then Alt-click (Windows) or Option-click (Mac) to define the clone source. Once defined, position the cursor over the scribbles so that you can start to paint the cloned pixels to get rid of the scribbled.
4. Gimp
Several digital tools are included in GIMP version 2.8 that may get used to define undesired sections of your image. You should click and drag your cursor around it to determine the region’s boundary you desire to isolate. A keyboard shortcut cuts or deletes the area you have selected, leaving a blank space for you to alter your visual message once it has been created. The Clone tool copies an image or pattern using the current brush as a template. Select the tool icon from the tool palette on the left-hand side of the screen. Clone, adjust the settings you find in the palette below to establish the size of the brush and hardness, then go to the image and pick a source area to be taken to “clone” it above the doodling, and then click on the clone button. Use the Ctrl key to choose the region to be copied, then click on the first piece of the scribble inside the snapshot to select it for copying. The technique has several applications, the most notable of which is fixing damaged regions in digital photographs by “painting over” them with pixel data from other photograph parts. It takes some time to master this method, but it may be pretty effective in the hands of an experienced practitioner.
5. Adobe Photoshop Lightroom
If you attempted to cover over a portion of a screenshot using the brush tool, the resulting region would be flat and devoid of any depth, tone, or shading. As a result, the painted area would be visible to the spectator. Adobe created the Clone Stamp tool in lightroom to allow for more nuanced picture manipulation. The Clone Stamp tool in Photoshop allows you to duplicate one portion of an image onto another section of the same picture. Photographers and designers frequently use the Clone Stamp tool to eliminate undesired components from photographs they have taken or designed. Using it, for example, you may disguise flaws on people’s faces by duplicating them from another section of their skin, or you can eliminate trees from a mountain vista by copying portions of the sky over them. The Clone Stamp allows you to paint with pixels that have been cloned from one piece of a picture and pasted onto another part of it. Consequently, the corrected region is virtually indistinguishable from the remainder of the image. As a result, if you know how to use one of the Clone Stamp’s descendant tools, you can use them all. It is especially true for the Pattern Stamp and Healing Brush, all descended from the Clone Stamp.
6. Adobe Photoshop Fix
Using Photoshop, it is often possible to remove doodles from screenshots and images; however, the operations’ complexity depends on where the mark to be removed is placed. For example, if it is over an area of a monochrome photograph, it will be easier to delete than above the subject. The most common cause for the Clone Stamp to cease operating is that the incorrect layer has gotten selected, which is the default. The improper layer selection in the Layers Panel may cause your edits to be concealed or the wrong sample used in your final image. The Clone Stamp tool in Photoshop Fix provides an even more effective method of copying a portion of a picture to another section of the same photo. Using your finger, press on the “source region” that you wish to replicate, and then drag it to another portion of the same picture with the brush tool.
7. Clip Studio Paint
Featuring a variety of helpful and distinctive features, Clip Studio Paint is a highly adaptable digital painting application that is great for rendering and inking work. It is simple to learn, and it comes with a large number of tools and unique brushes that allow you to paint and create any style of artwork you choose. Clip Studio Paint is the ultimate marriage of Adobe Photoshop and Paint Tool SAI. It is available for both Mac and Windows. It combines the most remarkable features of both programs for painters in a single package at the most competitive price. The tiny Paint Tool SAI application is less intimidating for beginning digital artists, and it is a beautiful beginner’s program for those just starting. Even though Clip Studio Paint is not designed for image editing, it has several ideal functions for cleaning up scans and pictures and preparing your images for printing.
8. inPixio Remove background
InPixio is a collection of independent apps that differ in specialized features and tools designed to deal with a particular photograph component. These tools assist in changing the backdrop of a photograph, removing unwanted parts from a picture, and creating beautiful collages. Suppose you are new to photography and need to quickly and easily enhance your images. In that case, InPixio is the perfect choice for you since it offers several simple-to-use features that eliminate distracting aspects from the picture, as well as a steady learning curve. Many options are available in InPixio, including light control (exposure, brightness, contrast) levels correction (curves, and color correction). Aside from that, the software offers a variety of frames and preset filters, textures, and effects, such as soft focus, noise reduction, and vignette. You can easily erase undesired information from a photograph without sacrificing image quality with the Erase feature. You have the option of deleting the highlighted zones or restoring the background. Editing the image is easier with the pick option that includes intelligent color detection. With its assistance, you may effortlessly take off any scribbles on your screenshot.
The Takeaway
You may find yourself having to share a screenshot that you would have scribbled on. Fortunately, it has become easy to remove any marks on pictures before you share them again. This article gave you five of the apps you can use to edit your screenshots without compromising the quality of your photos.
Δ
title: “How To Remove Scribbles On A Screenshot” ShowToc: true date: “2022-10-19” author: “Monica Rogers”
It’s especially annoying when the scribble on the screenshot is red. If your aim is to mask this, you’re going to struggle. With red drawings, you need to use a clone or stamp tool to get rid of them. You can use techniques like blurring because it’ll still be very obvious. A high-end photoshopping software such as Photoshop, getting rid of scribbles is typically accomplished by using the background to mask over the scribbles, resulting in the scribbles disappearing and appearing in the background or screenshot that you selected. If you don’t want to download apps on your Android or iPhone, then you can use an online tool like Photopea (free version of photoshop and you can use it online) which has a clone tool as well as a stamp tool which is all you need to remove scribbles on a screenshot.
How to Remove Scribbles On a Screenshot
1. Using TouchRetouch
It’s horrifying to discover a picture or screenshots that’s been viciously scribbled on, and, understandably, to feel there’s absolutely no hope of fixing it. Well, here’s where you’re wrong. By using the app ‘TouchRetouch,’ available on iOS and Android, you can remove scribbles and drawings on a picture of your choice. The TouchRetouch app will allow you to remove doodles on photos or screenshots on your Android device as well as your iPhone. Getting rid of scribbles can also be done on high-end photoshopping software such as Photoshop and it usually consists of you using the background to mask over the scribbles so that the scribbles disappear and looks like the background or another location of the photo or screenshot that you selected. The TouchRetouch, unfortunately, costs some small change. It’s $1.99 on the day this article was published. Tap ‘Buy’ and, after you confirm your payment method and any other needed information, it will automatically download and install the TouchRetouch app straight to your Android device.
- Choose the location of the screenshot you have a desire to alter or you can take your own.
- There’s several tools to use in the TouchRetouch app, like:
Brush Lasso Erase And Settings.
Each tool, obviously, does something different, however, the tools ‘Brush’ and ‘Lasso’ are the same tool only the way they’re use is different. For example, when you want to remove scribbles from a screenshot, you can either use a big brush and get the general area, or use the lasso tool for slightly more precision.
At any rate, the tool you want to use is the ‘Brush’ tool. Go ahead and select it. You’ll get the opportunity to adjust the size of your brush to the size you need. If it’s small scribblers, go for a smaller brush size. After you’ve select the Brush tool, take your finger and highlight the scribbles you want to erase.
When you’re satisfied with what you’ve highlighted, tap ‘GO’ and the TouchRetouch will remove the object. However, since removing the object leaves a void behind (since the textures were photographed behind the object) TouchRetouch will actually snag the surrounding textures and match the void to the surrounding textures as best as possible. In fact, if you aren’t satisfied with the retexture, you can retouch the photo as many times as you want.
2. Stamp Tool Photoshop
If the background of the rest of the picture and where the scribbles are is similar, then you can use the Stamp Tool. The Clone Stamp tool allows you to paint one part of an image over another part of the same image. To use the Clone Stamp tool, click and hold the rubber stamp icon in the toolbox and select Clone Stamp Tool in the flyout menu. From here, you can adjust the brush size and shape, flow, opacity, and blending modes.
3. Clone Tool In Photoshop
You can use the clone tool in Photoshop which will allow you to use one part of the screenshot to get rid of the scribbles. In Photoshop, the clone tool erases scribbles from pictures by using the information from one part of the image to replace another part of the image which would be the scribbles. To use the clone tool, select the Clone Stamp tool and position the cursor over the area you want to clone and then Alt-click (Windows) or Option-click (Mac) to define the clone source. Once defined, position the cursor over the scribbles so that you can start to paint the cloned pixels to get rid of the scribbled.
4. Gimp
Several digital tools are included in GIMP version 2.8 that may get used to define undesired sections of your image. You should click and drag your cursor around it to determine the region’s boundary you desire to isolate. A keyboard shortcut cuts or deletes the area you have selected, leaving a blank space for you to alter your visual message once it has been created. The Clone tool copies an image or pattern using the current brush as a template. Select the tool icon from the tool palette on the left-hand side of the screen. Clone, adjust the settings you find in the palette below to establish the size of the brush and hardness, then go to the image and pick a source area to be taken to “clone” it above the doodling, and then click on the clone button. Use the Ctrl key to choose the region to be copied, then click on the first piece of the scribble inside the snapshot to select it for copying. The technique has several applications, the most notable of which is fixing damaged regions in digital photographs by “painting over” them with pixel data from other photograph parts. It takes some time to master this method, but it may be pretty effective in the hands of an experienced practitioner.
5. Adobe Photoshop Lightroom
If you attempted to cover over a portion of a screenshot using the brush tool, the resulting region would be flat and devoid of any depth, tone, or shading. As a result, the painted area would be visible to the spectator. Adobe created the Clone Stamp tool in lightroom to allow for more nuanced picture manipulation. The Clone Stamp tool in Photoshop allows you to duplicate one portion of an image onto another section of the same picture. Photographers and designers frequently use the Clone Stamp tool to eliminate undesired components from photographs they have taken or designed. Using it, for example, you may disguise flaws on people’s faces by duplicating them from another section of their skin, or you can eliminate trees from a mountain vista by copying portions of the sky over them. The Clone Stamp allows you to paint with pixels that have been cloned from one piece of a picture and pasted onto another part of it. Consequently, the corrected region is virtually indistinguishable from the remainder of the image. As a result, if you know how to use one of the Clone Stamp’s descendant tools, you can use them all. It is especially true for the Pattern Stamp and Healing Brush, all descended from the Clone Stamp.
6. Adobe Photoshop Fix
Using Photoshop, it is often possible to remove doodles from screenshots and images; however, the operations’ complexity depends on where the mark to be removed is placed. For example, if it is over an area of a monochrome photograph, it will be easier to delete than above the subject. The most common cause for the Clone Stamp to cease operating is that the incorrect layer has gotten selected, which is the default. The improper layer selection in the Layers Panel may cause your edits to be concealed or the wrong sample used in your final image. The Clone Stamp tool in Photoshop Fix provides an even more effective method of copying a portion of a picture to another section of the same photo. Using your finger, press on the “source region” that you wish to replicate, and then drag it to another portion of the same picture with the brush tool.
7. Clip Studio Paint
Featuring a variety of helpful and distinctive features, Clip Studio Paint is a highly adaptable digital painting application that is great for rendering and inking work. It is simple to learn, and it comes with a large number of tools and unique brushes that allow you to paint and create any style of artwork you choose. Clip Studio Paint is the ultimate marriage of Adobe Photoshop and Paint Tool SAI. It is available for both Mac and Windows. It combines the most remarkable features of both programs for painters in a single package at the most competitive price. The tiny Paint Tool SAI application is less intimidating for beginning digital artists, and it is a beautiful beginner’s program for those just starting. Even though Clip Studio Paint is not designed for image editing, it has several ideal functions for cleaning up scans and pictures and preparing your images for printing.
8. inPixio Remove background
InPixio is a collection of independent apps that differ in specialized features and tools designed to deal with a particular photograph component. These tools assist in changing the backdrop of a photograph, removing unwanted parts from a picture, and creating beautiful collages. Suppose you are new to photography and need to quickly and easily enhance your images. In that case, InPixio is the perfect choice for you since it offers several simple-to-use features that eliminate distracting aspects from the picture, as well as a steady learning curve. Many options are available in InPixio, including light control (exposure, brightness, contrast) levels correction (curves, and color correction). Aside from that, the software offers a variety of frames and preset filters, textures, and effects, such as soft focus, noise reduction, and vignette. You can easily erase undesired information from a photograph without sacrificing image quality with the Erase feature. You have the option of deleting the highlighted zones or restoring the background. Editing the image is easier with the pick option that includes intelligent color detection. With its assistance, you may effortlessly take off any scribbles on your screenshot.
The Takeaway
You may find yourself having to share a screenshot that you would have scribbled on. Fortunately, it has become easy to remove any marks on pictures before you share them again. This article gave you five of the apps you can use to edit your screenshots without compromising the quality of your photos.
Δ
title: “How To Remove Scribbles On A Screenshot” ShowToc: true date: “2022-12-16” author: “Martin Romero”
It’s especially annoying when the scribble on the screenshot is red. If your aim is to mask this, you’re going to struggle. With red drawings, you need to use a clone or stamp tool to get rid of them. You can use techniques like blurring because it’ll still be very obvious. A high-end photoshopping software such as Photoshop, getting rid of scribbles is typically accomplished by using the background to mask over the scribbles, resulting in the scribbles disappearing and appearing in the background or screenshot that you selected. If you don’t want to download apps on your Android or iPhone, then you can use an online tool like Photopea (free version of photoshop and you can use it online) which has a clone tool as well as a stamp tool which is all you need to remove scribbles on a screenshot.
How to Remove Scribbles On a Screenshot
1. Using TouchRetouch
It’s horrifying to discover a picture or screenshots that’s been viciously scribbled on, and, understandably, to feel there’s absolutely no hope of fixing it. Well, here’s where you’re wrong. By using the app ‘TouchRetouch,’ available on iOS and Android, you can remove scribbles and drawings on a picture of your choice. The TouchRetouch app will allow you to remove doodles on photos or screenshots on your Android device as well as your iPhone. Getting rid of scribbles can also be done on high-end photoshopping software such as Photoshop and it usually consists of you using the background to mask over the scribbles so that the scribbles disappear and looks like the background or another location of the photo or screenshot that you selected. The TouchRetouch, unfortunately, costs some small change. It’s $1.99 on the day this article was published. Tap ‘Buy’ and, after you confirm your payment method and any other needed information, it will automatically download and install the TouchRetouch app straight to your Android device.
- Choose the location of the screenshot you have a desire to alter or you can take your own.
- There’s several tools to use in the TouchRetouch app, like:
Brush Lasso Erase And Settings.
Each tool, obviously, does something different, however, the tools ‘Brush’ and ‘Lasso’ are the same tool only the way they’re use is different. For example, when you want to remove scribbles from a screenshot, you can either use a big brush and get the general area, or use the lasso tool for slightly more precision.
At any rate, the tool you want to use is the ‘Brush’ tool. Go ahead and select it. You’ll get the opportunity to adjust the size of your brush to the size you need. If it’s small scribblers, go for a smaller brush size. After you’ve select the Brush tool, take your finger and highlight the scribbles you want to erase.
When you’re satisfied with what you’ve highlighted, tap ‘GO’ and the TouchRetouch will remove the object. However, since removing the object leaves a void behind (since the textures were photographed behind the object) TouchRetouch will actually snag the surrounding textures and match the void to the surrounding textures as best as possible. In fact, if you aren’t satisfied with the retexture, you can retouch the photo as many times as you want.
2. Stamp Tool Photoshop
If the background of the rest of the picture and where the scribbles are is similar, then you can use the Stamp Tool. The Clone Stamp tool allows you to paint one part of an image over another part of the same image. To use the Clone Stamp tool, click and hold the rubber stamp icon in the toolbox and select Clone Stamp Tool in the flyout menu. From here, you can adjust the brush size and shape, flow, opacity, and blending modes.
3. Clone Tool In Photoshop
You can use the clone tool in Photoshop which will allow you to use one part of the screenshot to get rid of the scribbles. In Photoshop, the clone tool erases scribbles from pictures by using the information from one part of the image to replace another part of the image which would be the scribbles. To use the clone tool, select the Clone Stamp tool and position the cursor over the area you want to clone and then Alt-click (Windows) or Option-click (Mac) to define the clone source. Once defined, position the cursor over the scribbles so that you can start to paint the cloned pixels to get rid of the scribbled.
4. Gimp
Several digital tools are included in GIMP version 2.8 that may get used to define undesired sections of your image. You should click and drag your cursor around it to determine the region’s boundary you desire to isolate. A keyboard shortcut cuts or deletes the area you have selected, leaving a blank space for you to alter your visual message once it has been created. The Clone tool copies an image or pattern using the current brush as a template. Select the tool icon from the tool palette on the left-hand side of the screen. Clone, adjust the settings you find in the palette below to establish the size of the brush and hardness, then go to the image and pick a source area to be taken to “clone” it above the doodling, and then click on the clone button. Use the Ctrl key to choose the region to be copied, then click on the first piece of the scribble inside the snapshot to select it for copying. The technique has several applications, the most notable of which is fixing damaged regions in digital photographs by “painting over” them with pixel data from other photograph parts. It takes some time to master this method, but it may be pretty effective in the hands of an experienced practitioner.
5. Adobe Photoshop Lightroom
If you attempted to cover over a portion of a screenshot using the brush tool, the resulting region would be flat and devoid of any depth, tone, or shading. As a result, the painted area would be visible to the spectator. Adobe created the Clone Stamp tool in lightroom to allow for more nuanced picture manipulation. The Clone Stamp tool in Photoshop allows you to duplicate one portion of an image onto another section of the same picture. Photographers and designers frequently use the Clone Stamp tool to eliminate undesired components from photographs they have taken or designed. Using it, for example, you may disguise flaws on people’s faces by duplicating them from another section of their skin, or you can eliminate trees from a mountain vista by copying portions of the sky over them. The Clone Stamp allows you to paint with pixels that have been cloned from one piece of a picture and pasted onto another part of it. Consequently, the corrected region is virtually indistinguishable from the remainder of the image. As a result, if you know how to use one of the Clone Stamp’s descendant tools, you can use them all. It is especially true for the Pattern Stamp and Healing Brush, all descended from the Clone Stamp.
6. Adobe Photoshop Fix
Using Photoshop, it is often possible to remove doodles from screenshots and images; however, the operations’ complexity depends on where the mark to be removed is placed. For example, if it is over an area of a monochrome photograph, it will be easier to delete than above the subject. The most common cause for the Clone Stamp to cease operating is that the incorrect layer has gotten selected, which is the default. The improper layer selection in the Layers Panel may cause your edits to be concealed or the wrong sample used in your final image. The Clone Stamp tool in Photoshop Fix provides an even more effective method of copying a portion of a picture to another section of the same photo. Using your finger, press on the “source region” that you wish to replicate, and then drag it to another portion of the same picture with the brush tool.
7. Clip Studio Paint
Featuring a variety of helpful and distinctive features, Clip Studio Paint is a highly adaptable digital painting application that is great for rendering and inking work. It is simple to learn, and it comes with a large number of tools and unique brushes that allow you to paint and create any style of artwork you choose. Clip Studio Paint is the ultimate marriage of Adobe Photoshop and Paint Tool SAI. It is available for both Mac and Windows. It combines the most remarkable features of both programs for painters in a single package at the most competitive price. The tiny Paint Tool SAI application is less intimidating for beginning digital artists, and it is a beautiful beginner’s program for those just starting. Even though Clip Studio Paint is not designed for image editing, it has several ideal functions for cleaning up scans and pictures and preparing your images for printing.
8. inPixio Remove background
InPixio is a collection of independent apps that differ in specialized features and tools designed to deal with a particular photograph component. These tools assist in changing the backdrop of a photograph, removing unwanted parts from a picture, and creating beautiful collages. Suppose you are new to photography and need to quickly and easily enhance your images. In that case, InPixio is the perfect choice for you since it offers several simple-to-use features that eliminate distracting aspects from the picture, as well as a steady learning curve. Many options are available in InPixio, including light control (exposure, brightness, contrast) levels correction (curves, and color correction). Aside from that, the software offers a variety of frames and preset filters, textures, and effects, such as soft focus, noise reduction, and vignette. You can easily erase undesired information from a photograph without sacrificing image quality with the Erase feature. You have the option of deleting the highlighted zones or restoring the background. Editing the image is easier with the pick option that includes intelligent color detection. With its assistance, you may effortlessly take off any scribbles on your screenshot.
The Takeaway
You may find yourself having to share a screenshot that you would have scribbled on. Fortunately, it has become easy to remove any marks on pictures before you share them again. This article gave you five of the apps you can use to edit your screenshots without compromising the quality of your photos.
Δ
title: “How To Remove Scribbles On A Screenshot” ShowToc: true date: “2022-11-25” author: “Antonio Anderson”
It’s especially annoying when the scribble on the screenshot is red. If your aim is to mask this, you’re going to struggle. With red drawings, you need to use a clone or stamp tool to get rid of them. You can use techniques like blurring because it’ll still be very obvious. A high-end photoshopping software such as Photoshop, getting rid of scribbles is typically accomplished by using the background to mask over the scribbles, resulting in the scribbles disappearing and appearing in the background or screenshot that you selected. If you don’t want to download apps on your Android or iPhone, then you can use an online tool like Photopea (free version of photoshop and you can use it online) which has a clone tool as well as a stamp tool which is all you need to remove scribbles on a screenshot.
How to Remove Scribbles On a Screenshot
1. Using TouchRetouch
It’s horrifying to discover a picture or screenshots that’s been viciously scribbled on, and, understandably, to feel there’s absolutely no hope of fixing it. Well, here’s where you’re wrong. By using the app ‘TouchRetouch,’ available on iOS and Android, you can remove scribbles and drawings on a picture of your choice. The TouchRetouch app will allow you to remove doodles on photos or screenshots on your Android device as well as your iPhone. Getting rid of scribbles can also be done on high-end photoshopping software such as Photoshop and it usually consists of you using the background to mask over the scribbles so that the scribbles disappear and looks like the background or another location of the photo or screenshot that you selected. The TouchRetouch, unfortunately, costs some small change. It’s $1.99 on the day this article was published. Tap ‘Buy’ and, after you confirm your payment method and any other needed information, it will automatically download and install the TouchRetouch app straight to your Android device.
- Choose the location of the screenshot you have a desire to alter or you can take your own.
- There’s several tools to use in the TouchRetouch app, like:
Brush Lasso Erase And Settings.
Each tool, obviously, does something different, however, the tools ‘Brush’ and ‘Lasso’ are the same tool only the way they’re use is different. For example, when you want to remove scribbles from a screenshot, you can either use a big brush and get the general area, or use the lasso tool for slightly more precision.
At any rate, the tool you want to use is the ‘Brush’ tool. Go ahead and select it. You’ll get the opportunity to adjust the size of your brush to the size you need. If it’s small scribblers, go for a smaller brush size. After you’ve select the Brush tool, take your finger and highlight the scribbles you want to erase.
When you’re satisfied with what you’ve highlighted, tap ‘GO’ and the TouchRetouch will remove the object. However, since removing the object leaves a void behind (since the textures were photographed behind the object) TouchRetouch will actually snag the surrounding textures and match the void to the surrounding textures as best as possible. In fact, if you aren’t satisfied with the retexture, you can retouch the photo as many times as you want.
2. Stamp Tool Photoshop
If the background of the rest of the picture and where the scribbles are is similar, then you can use the Stamp Tool. The Clone Stamp tool allows you to paint one part of an image over another part of the same image. To use the Clone Stamp tool, click and hold the rubber stamp icon in the toolbox and select Clone Stamp Tool in the flyout menu. From here, you can adjust the brush size and shape, flow, opacity, and blending modes.
3. Clone Tool In Photoshop
You can use the clone tool in Photoshop which will allow you to use one part of the screenshot to get rid of the scribbles. In Photoshop, the clone tool erases scribbles from pictures by using the information from one part of the image to replace another part of the image which would be the scribbles. To use the clone tool, select the Clone Stamp tool and position the cursor over the area you want to clone and then Alt-click (Windows) or Option-click (Mac) to define the clone source. Once defined, position the cursor over the scribbles so that you can start to paint the cloned pixels to get rid of the scribbled.
4. Gimp
Several digital tools are included in GIMP version 2.8 that may get used to define undesired sections of your image. You should click and drag your cursor around it to determine the region’s boundary you desire to isolate. A keyboard shortcut cuts or deletes the area you have selected, leaving a blank space for you to alter your visual message once it has been created. The Clone tool copies an image or pattern using the current brush as a template. Select the tool icon from the tool palette on the left-hand side of the screen. Clone, adjust the settings you find in the palette below to establish the size of the brush and hardness, then go to the image and pick a source area to be taken to “clone” it above the doodling, and then click on the clone button. Use the Ctrl key to choose the region to be copied, then click on the first piece of the scribble inside the snapshot to select it for copying. The technique has several applications, the most notable of which is fixing damaged regions in digital photographs by “painting over” them with pixel data from other photograph parts. It takes some time to master this method, but it may be pretty effective in the hands of an experienced practitioner.
5. Adobe Photoshop Lightroom
If you attempted to cover over a portion of a screenshot using the brush tool, the resulting region would be flat and devoid of any depth, tone, or shading. As a result, the painted area would be visible to the spectator. Adobe created the Clone Stamp tool in lightroom to allow for more nuanced picture manipulation. The Clone Stamp tool in Photoshop allows you to duplicate one portion of an image onto another section of the same picture. Photographers and designers frequently use the Clone Stamp tool to eliminate undesired components from photographs they have taken or designed. Using it, for example, you may disguise flaws on people’s faces by duplicating them from another section of their skin, or you can eliminate trees from a mountain vista by copying portions of the sky over them. The Clone Stamp allows you to paint with pixels that have been cloned from one piece of a picture and pasted onto another part of it. Consequently, the corrected region is virtually indistinguishable from the remainder of the image. As a result, if you know how to use one of the Clone Stamp’s descendant tools, you can use them all. It is especially true for the Pattern Stamp and Healing Brush, all descended from the Clone Stamp.
6. Adobe Photoshop Fix
Using Photoshop, it is often possible to remove doodles from screenshots and images; however, the operations’ complexity depends on where the mark to be removed is placed. For example, if it is over an area of a monochrome photograph, it will be easier to delete than above the subject. The most common cause for the Clone Stamp to cease operating is that the incorrect layer has gotten selected, which is the default. The improper layer selection in the Layers Panel may cause your edits to be concealed or the wrong sample used in your final image. The Clone Stamp tool in Photoshop Fix provides an even more effective method of copying a portion of a picture to another section of the same photo. Using your finger, press on the “source region” that you wish to replicate, and then drag it to another portion of the same picture with the brush tool.
7. Clip Studio Paint
Featuring a variety of helpful and distinctive features, Clip Studio Paint is a highly adaptable digital painting application that is great for rendering and inking work. It is simple to learn, and it comes with a large number of tools and unique brushes that allow you to paint and create any style of artwork you choose. Clip Studio Paint is the ultimate marriage of Adobe Photoshop and Paint Tool SAI. It is available for both Mac and Windows. It combines the most remarkable features of both programs for painters in a single package at the most competitive price. The tiny Paint Tool SAI application is less intimidating for beginning digital artists, and it is a beautiful beginner’s program for those just starting. Even though Clip Studio Paint is not designed for image editing, it has several ideal functions for cleaning up scans and pictures and preparing your images for printing.
8. inPixio Remove background
InPixio is a collection of independent apps that differ in specialized features and tools designed to deal with a particular photograph component. These tools assist in changing the backdrop of a photograph, removing unwanted parts from a picture, and creating beautiful collages. Suppose you are new to photography and need to quickly and easily enhance your images. In that case, InPixio is the perfect choice for you since it offers several simple-to-use features that eliminate distracting aspects from the picture, as well as a steady learning curve. Many options are available in InPixio, including light control (exposure, brightness, contrast) levels correction (curves, and color correction). Aside from that, the software offers a variety of frames and preset filters, textures, and effects, such as soft focus, noise reduction, and vignette. You can easily erase undesired information from a photograph without sacrificing image quality with the Erase feature. You have the option of deleting the highlighted zones or restoring the background. Editing the image is easier with the pick option that includes intelligent color detection. With its assistance, you may effortlessly take off any scribbles on your screenshot.
The Takeaway
You may find yourself having to share a screenshot that you would have scribbled on. Fortunately, it has become easy to remove any marks on pictures before you share them again. This article gave you five of the apps you can use to edit your screenshots without compromising the quality of your photos.
Δ
title: “How To Remove Scribbles On A Screenshot” ShowToc: true date: “2022-10-24” author: “Lisa Graziano”
It’s especially annoying when the scribble on the screenshot is red. If your aim is to mask this, you’re going to struggle. With red drawings, you need to use a clone or stamp tool to get rid of them. You can use techniques like blurring because it’ll still be very obvious. A high-end photoshopping software such as Photoshop, getting rid of scribbles is typically accomplished by using the background to mask over the scribbles, resulting in the scribbles disappearing and appearing in the background or screenshot that you selected. If you don’t want to download apps on your Android or iPhone, then you can use an online tool like Photopea (free version of photoshop and you can use it online) which has a clone tool as well as a stamp tool which is all you need to remove scribbles on a screenshot.
How to Remove Scribbles On a Screenshot
1. Using TouchRetouch
It’s horrifying to discover a picture or screenshots that’s been viciously scribbled on, and, understandably, to feel there’s absolutely no hope of fixing it. Well, here’s where you’re wrong. By using the app ‘TouchRetouch,’ available on iOS and Android, you can remove scribbles and drawings on a picture of your choice. The TouchRetouch app will allow you to remove doodles on photos or screenshots on your Android device as well as your iPhone. Getting rid of scribbles can also be done on high-end photoshopping software such as Photoshop and it usually consists of you using the background to mask over the scribbles so that the scribbles disappear and looks like the background or another location of the photo or screenshot that you selected. The TouchRetouch, unfortunately, costs some small change. It’s $1.99 on the day this article was published. Tap ‘Buy’ and, after you confirm your payment method and any other needed information, it will automatically download and install the TouchRetouch app straight to your Android device.
- Choose the location of the screenshot you have a desire to alter or you can take your own.
- There’s several tools to use in the TouchRetouch app, like:
Brush Lasso Erase And Settings.
Each tool, obviously, does something different, however, the tools ‘Brush’ and ‘Lasso’ are the same tool only the way they’re use is different. For example, when you want to remove scribbles from a screenshot, you can either use a big brush and get the general area, or use the lasso tool for slightly more precision.
At any rate, the tool you want to use is the ‘Brush’ tool. Go ahead and select it. You’ll get the opportunity to adjust the size of your brush to the size you need. If it’s small scribblers, go for a smaller brush size. After you’ve select the Brush tool, take your finger and highlight the scribbles you want to erase.
When you’re satisfied with what you’ve highlighted, tap ‘GO’ and the TouchRetouch will remove the object. However, since removing the object leaves a void behind (since the textures were photographed behind the object) TouchRetouch will actually snag the surrounding textures and match the void to the surrounding textures as best as possible. In fact, if you aren’t satisfied with the retexture, you can retouch the photo as many times as you want.
2. Stamp Tool Photoshop
If the background of the rest of the picture and where the scribbles are is similar, then you can use the Stamp Tool. The Clone Stamp tool allows you to paint one part of an image over another part of the same image. To use the Clone Stamp tool, click and hold the rubber stamp icon in the toolbox and select Clone Stamp Tool in the flyout menu. From here, you can adjust the brush size and shape, flow, opacity, and blending modes.
3. Clone Tool In Photoshop
You can use the clone tool in Photoshop which will allow you to use one part of the screenshot to get rid of the scribbles. In Photoshop, the clone tool erases scribbles from pictures by using the information from one part of the image to replace another part of the image which would be the scribbles. To use the clone tool, select the Clone Stamp tool and position the cursor over the area you want to clone and then Alt-click (Windows) or Option-click (Mac) to define the clone source. Once defined, position the cursor over the scribbles so that you can start to paint the cloned pixels to get rid of the scribbled.
4. Gimp
Several digital tools are included in GIMP version 2.8 that may get used to define undesired sections of your image. You should click and drag your cursor around it to determine the region’s boundary you desire to isolate. A keyboard shortcut cuts or deletes the area you have selected, leaving a blank space for you to alter your visual message once it has been created. The Clone tool copies an image or pattern using the current brush as a template. Select the tool icon from the tool palette on the left-hand side of the screen. Clone, adjust the settings you find in the palette below to establish the size of the brush and hardness, then go to the image and pick a source area to be taken to “clone” it above the doodling, and then click on the clone button. Use the Ctrl key to choose the region to be copied, then click on the first piece of the scribble inside the snapshot to select it for copying. The technique has several applications, the most notable of which is fixing damaged regions in digital photographs by “painting over” them with pixel data from other photograph parts. It takes some time to master this method, but it may be pretty effective in the hands of an experienced practitioner.
5. Adobe Photoshop Lightroom
If you attempted to cover over a portion of a screenshot using the brush tool, the resulting region would be flat and devoid of any depth, tone, or shading. As a result, the painted area would be visible to the spectator. Adobe created the Clone Stamp tool in lightroom to allow for more nuanced picture manipulation. The Clone Stamp tool in Photoshop allows you to duplicate one portion of an image onto another section of the same picture. Photographers and designers frequently use the Clone Stamp tool to eliminate undesired components from photographs they have taken or designed. Using it, for example, you may disguise flaws on people’s faces by duplicating them from another section of their skin, or you can eliminate trees from a mountain vista by copying portions of the sky over them. The Clone Stamp allows you to paint with pixels that have been cloned from one piece of a picture and pasted onto another part of it. Consequently, the corrected region is virtually indistinguishable from the remainder of the image. As a result, if you know how to use one of the Clone Stamp’s descendant tools, you can use them all. It is especially true for the Pattern Stamp and Healing Brush, all descended from the Clone Stamp.
6. Adobe Photoshop Fix
Using Photoshop, it is often possible to remove doodles from screenshots and images; however, the operations’ complexity depends on where the mark to be removed is placed. For example, if it is over an area of a monochrome photograph, it will be easier to delete than above the subject. The most common cause for the Clone Stamp to cease operating is that the incorrect layer has gotten selected, which is the default. The improper layer selection in the Layers Panel may cause your edits to be concealed or the wrong sample used in your final image. The Clone Stamp tool in Photoshop Fix provides an even more effective method of copying a portion of a picture to another section of the same photo. Using your finger, press on the “source region” that you wish to replicate, and then drag it to another portion of the same picture with the brush tool.
7. Clip Studio Paint
Featuring a variety of helpful and distinctive features, Clip Studio Paint is a highly adaptable digital painting application that is great for rendering and inking work. It is simple to learn, and it comes with a large number of tools and unique brushes that allow you to paint and create any style of artwork you choose. Clip Studio Paint is the ultimate marriage of Adobe Photoshop and Paint Tool SAI. It is available for both Mac and Windows. It combines the most remarkable features of both programs for painters in a single package at the most competitive price. The tiny Paint Tool SAI application is less intimidating for beginning digital artists, and it is a beautiful beginner’s program for those just starting. Even though Clip Studio Paint is not designed for image editing, it has several ideal functions for cleaning up scans and pictures and preparing your images for printing.
8. inPixio Remove background
InPixio is a collection of independent apps that differ in specialized features and tools designed to deal with a particular photograph component. These tools assist in changing the backdrop of a photograph, removing unwanted parts from a picture, and creating beautiful collages. Suppose you are new to photography and need to quickly and easily enhance your images. In that case, InPixio is the perfect choice for you since it offers several simple-to-use features that eliminate distracting aspects from the picture, as well as a steady learning curve. Many options are available in InPixio, including light control (exposure, brightness, contrast) levels correction (curves, and color correction). Aside from that, the software offers a variety of frames and preset filters, textures, and effects, such as soft focus, noise reduction, and vignette. You can easily erase undesired information from a photograph without sacrificing image quality with the Erase feature. You have the option of deleting the highlighted zones or restoring the background. Editing the image is easier with the pick option that includes intelligent color detection. With its assistance, you may effortlessly take off any scribbles on your screenshot.
The Takeaway
You may find yourself having to share a screenshot that you would have scribbled on. Fortunately, it has become easy to remove any marks on pictures before you share them again. This article gave you five of the apps you can use to edit your screenshots without compromising the quality of your photos.
Δ
title: “How To Remove Scribbles On A Screenshot” ShowToc: true date: “2022-11-02” author: “Samantha Ingram”
It’s especially annoying when the scribble on the screenshot is red. If your aim is to mask this, you’re going to struggle. With red drawings, you need to use a clone or stamp tool to get rid of them. You can use techniques like blurring because it’ll still be very obvious. A high-end photoshopping software such as Photoshop, getting rid of scribbles is typically accomplished by using the background to mask over the scribbles, resulting in the scribbles disappearing and appearing in the background or screenshot that you selected. If you don’t want to download apps on your Android or iPhone, then you can use an online tool like Photopea (free version of photoshop and you can use it online) which has a clone tool as well as a stamp tool which is all you need to remove scribbles on a screenshot.
How to Remove Scribbles On a Screenshot
1. Using TouchRetouch
It’s horrifying to discover a picture or screenshots that’s been viciously scribbled on, and, understandably, to feel there’s absolutely no hope of fixing it. Well, here’s where you’re wrong. By using the app ‘TouchRetouch,’ available on iOS and Android, you can remove scribbles and drawings on a picture of your choice. The TouchRetouch app will allow you to remove doodles on photos or screenshots on your Android device as well as your iPhone. Getting rid of scribbles can also be done on high-end photoshopping software such as Photoshop and it usually consists of you using the background to mask over the scribbles so that the scribbles disappear and looks like the background or another location of the photo or screenshot that you selected. The TouchRetouch, unfortunately, costs some small change. It’s $1.99 on the day this article was published. Tap ‘Buy’ and, after you confirm your payment method and any other needed information, it will automatically download and install the TouchRetouch app straight to your Android device.
- Choose the location of the screenshot you have a desire to alter or you can take your own.
- There’s several tools to use in the TouchRetouch app, like:
Brush Lasso Erase And Settings.
Each tool, obviously, does something different, however, the tools ‘Brush’ and ‘Lasso’ are the same tool only the way they’re use is different. For example, when you want to remove scribbles from a screenshot, you can either use a big brush and get the general area, or use the lasso tool for slightly more precision.
At any rate, the tool you want to use is the ‘Brush’ tool. Go ahead and select it. You’ll get the opportunity to adjust the size of your brush to the size you need. If it’s small scribblers, go for a smaller brush size. After you’ve select the Brush tool, take your finger and highlight the scribbles you want to erase.
When you’re satisfied with what you’ve highlighted, tap ‘GO’ and the TouchRetouch will remove the object. However, since removing the object leaves a void behind (since the textures were photographed behind the object) TouchRetouch will actually snag the surrounding textures and match the void to the surrounding textures as best as possible. In fact, if you aren’t satisfied with the retexture, you can retouch the photo as many times as you want.
2. Stamp Tool Photoshop
If the background of the rest of the picture and where the scribbles are is similar, then you can use the Stamp Tool. The Clone Stamp tool allows you to paint one part of an image over another part of the same image. To use the Clone Stamp tool, click and hold the rubber stamp icon in the toolbox and select Clone Stamp Tool in the flyout menu. From here, you can adjust the brush size and shape, flow, opacity, and blending modes.
3. Clone Tool In Photoshop
You can use the clone tool in Photoshop which will allow you to use one part of the screenshot to get rid of the scribbles. In Photoshop, the clone tool erases scribbles from pictures by using the information from one part of the image to replace another part of the image which would be the scribbles. To use the clone tool, select the Clone Stamp tool and position the cursor over the area you want to clone and then Alt-click (Windows) or Option-click (Mac) to define the clone source. Once defined, position the cursor over the scribbles so that you can start to paint the cloned pixels to get rid of the scribbled.
4. Gimp
Several digital tools are included in GIMP version 2.8 that may get used to define undesired sections of your image. You should click and drag your cursor around it to determine the region’s boundary you desire to isolate. A keyboard shortcut cuts or deletes the area you have selected, leaving a blank space for you to alter your visual message once it has been created. The Clone tool copies an image or pattern using the current brush as a template. Select the tool icon from the tool palette on the left-hand side of the screen. Clone, adjust the settings you find in the palette below to establish the size of the brush and hardness, then go to the image and pick a source area to be taken to “clone” it above the doodling, and then click on the clone button. Use the Ctrl key to choose the region to be copied, then click on the first piece of the scribble inside the snapshot to select it for copying. The technique has several applications, the most notable of which is fixing damaged regions in digital photographs by “painting over” them with pixel data from other photograph parts. It takes some time to master this method, but it may be pretty effective in the hands of an experienced practitioner.
5. Adobe Photoshop Lightroom
If you attempted to cover over a portion of a screenshot using the brush tool, the resulting region would be flat and devoid of any depth, tone, or shading. As a result, the painted area would be visible to the spectator. Adobe created the Clone Stamp tool in lightroom to allow for more nuanced picture manipulation. The Clone Stamp tool in Photoshop allows you to duplicate one portion of an image onto another section of the same picture. Photographers and designers frequently use the Clone Stamp tool to eliminate undesired components from photographs they have taken or designed. Using it, for example, you may disguise flaws on people’s faces by duplicating them from another section of their skin, or you can eliminate trees from a mountain vista by copying portions of the sky over them. The Clone Stamp allows you to paint with pixels that have been cloned from one piece of a picture and pasted onto another part of it. Consequently, the corrected region is virtually indistinguishable from the remainder of the image. As a result, if you know how to use one of the Clone Stamp’s descendant tools, you can use them all. It is especially true for the Pattern Stamp and Healing Brush, all descended from the Clone Stamp.
6. Adobe Photoshop Fix
Using Photoshop, it is often possible to remove doodles from screenshots and images; however, the operations’ complexity depends on where the mark to be removed is placed. For example, if it is over an area of a monochrome photograph, it will be easier to delete than above the subject. The most common cause for the Clone Stamp to cease operating is that the incorrect layer has gotten selected, which is the default. The improper layer selection in the Layers Panel may cause your edits to be concealed or the wrong sample used in your final image. The Clone Stamp tool in Photoshop Fix provides an even more effective method of copying a portion of a picture to another section of the same photo. Using your finger, press on the “source region” that you wish to replicate, and then drag it to another portion of the same picture with the brush tool.
7. Clip Studio Paint
Featuring a variety of helpful and distinctive features, Clip Studio Paint is a highly adaptable digital painting application that is great for rendering and inking work. It is simple to learn, and it comes with a large number of tools and unique brushes that allow you to paint and create any style of artwork you choose. Clip Studio Paint is the ultimate marriage of Adobe Photoshop and Paint Tool SAI. It is available for both Mac and Windows. It combines the most remarkable features of both programs for painters in a single package at the most competitive price. The tiny Paint Tool SAI application is less intimidating for beginning digital artists, and it is a beautiful beginner’s program for those just starting. Even though Clip Studio Paint is not designed for image editing, it has several ideal functions for cleaning up scans and pictures and preparing your images for printing.
8. inPixio Remove background
InPixio is a collection of independent apps that differ in specialized features and tools designed to deal with a particular photograph component. These tools assist in changing the backdrop of a photograph, removing unwanted parts from a picture, and creating beautiful collages. Suppose you are new to photography and need to quickly and easily enhance your images. In that case, InPixio is the perfect choice for you since it offers several simple-to-use features that eliminate distracting aspects from the picture, as well as a steady learning curve. Many options are available in InPixio, including light control (exposure, brightness, contrast) levels correction (curves, and color correction). Aside from that, the software offers a variety of frames and preset filters, textures, and effects, such as soft focus, noise reduction, and vignette. You can easily erase undesired information from a photograph without sacrificing image quality with the Erase feature. You have the option of deleting the highlighted zones or restoring the background. Editing the image is easier with the pick option that includes intelligent color detection. With its assistance, you may effortlessly take off any scribbles on your screenshot.
The Takeaway
You may find yourself having to share a screenshot that you would have scribbled on. Fortunately, it has become easy to remove any marks on pictures before you share them again. This article gave you five of the apps you can use to edit your screenshots without compromising the quality of your photos.
Δ
title: “How To Remove Scribbles On A Screenshot” ShowToc: true date: “2022-11-24” author: “George Inguardsen”
It’s especially annoying when the scribble on the screenshot is red. If your aim is to mask this, you’re going to struggle. With red drawings, you need to use a clone or stamp tool to get rid of them. You can use techniques like blurring because it’ll still be very obvious. A high-end photoshopping software such as Photoshop, getting rid of scribbles is typically accomplished by using the background to mask over the scribbles, resulting in the scribbles disappearing and appearing in the background or screenshot that you selected. If you don’t want to download apps on your Android or iPhone, then you can use an online tool like Photopea (free version of photoshop and you can use it online) which has a clone tool as well as a stamp tool which is all you need to remove scribbles on a screenshot.
How to Remove Scribbles On a Screenshot
1. Using TouchRetouch
It’s horrifying to discover a picture or screenshots that’s been viciously scribbled on, and, understandably, to feel there’s absolutely no hope of fixing it. Well, here’s where you’re wrong. By using the app ‘TouchRetouch,’ available on iOS and Android, you can remove scribbles and drawings on a picture of your choice. The TouchRetouch app will allow you to remove doodles on photos or screenshots on your Android device as well as your iPhone. Getting rid of scribbles can also be done on high-end photoshopping software such as Photoshop and it usually consists of you using the background to mask over the scribbles so that the scribbles disappear and looks like the background or another location of the photo or screenshot that you selected. The TouchRetouch, unfortunately, costs some small change. It’s $1.99 on the day this article was published. Tap ‘Buy’ and, after you confirm your payment method and any other needed information, it will automatically download and install the TouchRetouch app straight to your Android device.
- Choose the location of the screenshot you have a desire to alter or you can take your own.
- There’s several tools to use in the TouchRetouch app, like:
Brush Lasso Erase And Settings.
Each tool, obviously, does something different, however, the tools ‘Brush’ and ‘Lasso’ are the same tool only the way they’re use is different. For example, when you want to remove scribbles from a screenshot, you can either use a big brush and get the general area, or use the lasso tool for slightly more precision.
At any rate, the tool you want to use is the ‘Brush’ tool. Go ahead and select it. You’ll get the opportunity to adjust the size of your brush to the size you need. If it’s small scribblers, go for a smaller brush size. After you’ve select the Brush tool, take your finger and highlight the scribbles you want to erase.
When you’re satisfied with what you’ve highlighted, tap ‘GO’ and the TouchRetouch will remove the object. However, since removing the object leaves a void behind (since the textures were photographed behind the object) TouchRetouch will actually snag the surrounding textures and match the void to the surrounding textures as best as possible. In fact, if you aren’t satisfied with the retexture, you can retouch the photo as many times as you want.
2. Stamp Tool Photoshop
If the background of the rest of the picture and where the scribbles are is similar, then you can use the Stamp Tool. The Clone Stamp tool allows you to paint one part of an image over another part of the same image. To use the Clone Stamp tool, click and hold the rubber stamp icon in the toolbox and select Clone Stamp Tool in the flyout menu. From here, you can adjust the brush size and shape, flow, opacity, and blending modes.
3. Clone Tool In Photoshop
You can use the clone tool in Photoshop which will allow you to use one part of the screenshot to get rid of the scribbles. In Photoshop, the clone tool erases scribbles from pictures by using the information from one part of the image to replace another part of the image which would be the scribbles. To use the clone tool, select the Clone Stamp tool and position the cursor over the area you want to clone and then Alt-click (Windows) or Option-click (Mac) to define the clone source. Once defined, position the cursor over the scribbles so that you can start to paint the cloned pixels to get rid of the scribbled.
4. Gimp
Several digital tools are included in GIMP version 2.8 that may get used to define undesired sections of your image. You should click and drag your cursor around it to determine the region’s boundary you desire to isolate. A keyboard shortcut cuts or deletes the area you have selected, leaving a blank space for you to alter your visual message once it has been created. The Clone tool copies an image or pattern using the current brush as a template. Select the tool icon from the tool palette on the left-hand side of the screen. Clone, adjust the settings you find in the palette below to establish the size of the brush and hardness, then go to the image and pick a source area to be taken to “clone” it above the doodling, and then click on the clone button. Use the Ctrl key to choose the region to be copied, then click on the first piece of the scribble inside the snapshot to select it for copying. The technique has several applications, the most notable of which is fixing damaged regions in digital photographs by “painting over” them with pixel data from other photograph parts. It takes some time to master this method, but it may be pretty effective in the hands of an experienced practitioner.
5. Adobe Photoshop Lightroom
If you attempted to cover over a portion of a screenshot using the brush tool, the resulting region would be flat and devoid of any depth, tone, or shading. As a result, the painted area would be visible to the spectator. Adobe created the Clone Stamp tool in lightroom to allow for more nuanced picture manipulation. The Clone Stamp tool in Photoshop allows you to duplicate one portion of an image onto another section of the same picture. Photographers and designers frequently use the Clone Stamp tool to eliminate undesired components from photographs they have taken or designed. Using it, for example, you may disguise flaws on people’s faces by duplicating them from another section of their skin, or you can eliminate trees from a mountain vista by copying portions of the sky over them. The Clone Stamp allows you to paint with pixels that have been cloned from one piece of a picture and pasted onto another part of it. Consequently, the corrected region is virtually indistinguishable from the remainder of the image. As a result, if you know how to use one of the Clone Stamp’s descendant tools, you can use them all. It is especially true for the Pattern Stamp and Healing Brush, all descended from the Clone Stamp.
6. Adobe Photoshop Fix
Using Photoshop, it is often possible to remove doodles from screenshots and images; however, the operations’ complexity depends on where the mark to be removed is placed. For example, if it is over an area of a monochrome photograph, it will be easier to delete than above the subject. The most common cause for the Clone Stamp to cease operating is that the incorrect layer has gotten selected, which is the default. The improper layer selection in the Layers Panel may cause your edits to be concealed or the wrong sample used in your final image. The Clone Stamp tool in Photoshop Fix provides an even more effective method of copying a portion of a picture to another section of the same photo. Using your finger, press on the “source region” that you wish to replicate, and then drag it to another portion of the same picture with the brush tool.
7. Clip Studio Paint
Featuring a variety of helpful and distinctive features, Clip Studio Paint is a highly adaptable digital painting application that is great for rendering and inking work. It is simple to learn, and it comes with a large number of tools and unique brushes that allow you to paint and create any style of artwork you choose. Clip Studio Paint is the ultimate marriage of Adobe Photoshop and Paint Tool SAI. It is available for both Mac and Windows. It combines the most remarkable features of both programs for painters in a single package at the most competitive price. The tiny Paint Tool SAI application is less intimidating for beginning digital artists, and it is a beautiful beginner’s program for those just starting. Even though Clip Studio Paint is not designed for image editing, it has several ideal functions for cleaning up scans and pictures and preparing your images for printing.
8. inPixio Remove background
InPixio is a collection of independent apps that differ in specialized features and tools designed to deal with a particular photograph component. These tools assist in changing the backdrop of a photograph, removing unwanted parts from a picture, and creating beautiful collages. Suppose you are new to photography and need to quickly and easily enhance your images. In that case, InPixio is the perfect choice for you since it offers several simple-to-use features that eliminate distracting aspects from the picture, as well as a steady learning curve. Many options are available in InPixio, including light control (exposure, brightness, contrast) levels correction (curves, and color correction). Aside from that, the software offers a variety of frames and preset filters, textures, and effects, such as soft focus, noise reduction, and vignette. You can easily erase undesired information from a photograph without sacrificing image quality with the Erase feature. You have the option of deleting the highlighted zones or restoring the background. Editing the image is easier with the pick option that includes intelligent color detection. With its assistance, you may effortlessly take off any scribbles on your screenshot.
The Takeaway
You may find yourself having to share a screenshot that you would have scribbled on. Fortunately, it has become easy to remove any marks on pictures before you share them again. This article gave you five of the apps you can use to edit your screenshots without compromising the quality of your photos.
Δ
title: “How To Remove Scribbles On A Screenshot” ShowToc: true date: “2022-11-10” author: “Amanda Noah”
It’s especially annoying when the scribble on the screenshot is red. If your aim is to mask this, you’re going to struggle. With red drawings, you need to use a clone or stamp tool to get rid of them. You can use techniques like blurring because it’ll still be very obvious. A high-end photoshopping software such as Photoshop, getting rid of scribbles is typically accomplished by using the background to mask over the scribbles, resulting in the scribbles disappearing and appearing in the background or screenshot that you selected. If you don’t want to download apps on your Android or iPhone, then you can use an online tool like Photopea (free version of photoshop and you can use it online) which has a clone tool as well as a stamp tool which is all you need to remove scribbles on a screenshot.
How to Remove Scribbles On a Screenshot
1. Using TouchRetouch
It’s horrifying to discover a picture or screenshots that’s been viciously scribbled on, and, understandably, to feel there’s absolutely no hope of fixing it. Well, here’s where you’re wrong. By using the app ‘TouchRetouch,’ available on iOS and Android, you can remove scribbles and drawings on a picture of your choice. The TouchRetouch app will allow you to remove doodles on photos or screenshots on your Android device as well as your iPhone. Getting rid of scribbles can also be done on high-end photoshopping software such as Photoshop and it usually consists of you using the background to mask over the scribbles so that the scribbles disappear and looks like the background or another location of the photo or screenshot that you selected. The TouchRetouch, unfortunately, costs some small change. It’s $1.99 on the day this article was published. Tap ‘Buy’ and, after you confirm your payment method and any other needed information, it will automatically download and install the TouchRetouch app straight to your Android device.
- Choose the location of the screenshot you have a desire to alter or you can take your own.
- There’s several tools to use in the TouchRetouch app, like:
Brush Lasso Erase And Settings.
Each tool, obviously, does something different, however, the tools ‘Brush’ and ‘Lasso’ are the same tool only the way they’re use is different. For example, when you want to remove scribbles from a screenshot, you can either use a big brush and get the general area, or use the lasso tool for slightly more precision.
At any rate, the tool you want to use is the ‘Brush’ tool. Go ahead and select it. You’ll get the opportunity to adjust the size of your brush to the size you need. If it’s small scribblers, go for a smaller brush size. After you’ve select the Brush tool, take your finger and highlight the scribbles you want to erase.
When you’re satisfied with what you’ve highlighted, tap ‘GO’ and the TouchRetouch will remove the object. However, since removing the object leaves a void behind (since the textures were photographed behind the object) TouchRetouch will actually snag the surrounding textures and match the void to the surrounding textures as best as possible. In fact, if you aren’t satisfied with the retexture, you can retouch the photo as many times as you want.
2. Stamp Tool Photoshop
If the background of the rest of the picture and where the scribbles are is similar, then you can use the Stamp Tool. The Clone Stamp tool allows you to paint one part of an image over another part of the same image. To use the Clone Stamp tool, click and hold the rubber stamp icon in the toolbox and select Clone Stamp Tool in the flyout menu. From here, you can adjust the brush size and shape, flow, opacity, and blending modes.
3. Clone Tool In Photoshop
You can use the clone tool in Photoshop which will allow you to use one part of the screenshot to get rid of the scribbles. In Photoshop, the clone tool erases scribbles from pictures by using the information from one part of the image to replace another part of the image which would be the scribbles. To use the clone tool, select the Clone Stamp tool and position the cursor over the area you want to clone and then Alt-click (Windows) or Option-click (Mac) to define the clone source. Once defined, position the cursor over the scribbles so that you can start to paint the cloned pixels to get rid of the scribbled.
4. Gimp
Several digital tools are included in GIMP version 2.8 that may get used to define undesired sections of your image. You should click and drag your cursor around it to determine the region’s boundary you desire to isolate. A keyboard shortcut cuts or deletes the area you have selected, leaving a blank space for you to alter your visual message once it has been created. The Clone tool copies an image or pattern using the current brush as a template. Select the tool icon from the tool palette on the left-hand side of the screen. Clone, adjust the settings you find in the palette below to establish the size of the brush and hardness, then go to the image and pick a source area to be taken to “clone” it above the doodling, and then click on the clone button. Use the Ctrl key to choose the region to be copied, then click on the first piece of the scribble inside the snapshot to select it for copying. The technique has several applications, the most notable of which is fixing damaged regions in digital photographs by “painting over” them with pixel data from other photograph parts. It takes some time to master this method, but it may be pretty effective in the hands of an experienced practitioner.
5. Adobe Photoshop Lightroom
If you attempted to cover over a portion of a screenshot using the brush tool, the resulting region would be flat and devoid of any depth, tone, or shading. As a result, the painted area would be visible to the spectator. Adobe created the Clone Stamp tool in lightroom to allow for more nuanced picture manipulation. The Clone Stamp tool in Photoshop allows you to duplicate one portion of an image onto another section of the same picture. Photographers and designers frequently use the Clone Stamp tool to eliminate undesired components from photographs they have taken or designed. Using it, for example, you may disguise flaws on people’s faces by duplicating them from another section of their skin, or you can eliminate trees from a mountain vista by copying portions of the sky over them. The Clone Stamp allows you to paint with pixels that have been cloned from one piece of a picture and pasted onto another part of it. Consequently, the corrected region is virtually indistinguishable from the remainder of the image. As a result, if you know how to use one of the Clone Stamp’s descendant tools, you can use them all. It is especially true for the Pattern Stamp and Healing Brush, all descended from the Clone Stamp.
6. Adobe Photoshop Fix
Using Photoshop, it is often possible to remove doodles from screenshots and images; however, the operations’ complexity depends on where the mark to be removed is placed. For example, if it is over an area of a monochrome photograph, it will be easier to delete than above the subject. The most common cause for the Clone Stamp to cease operating is that the incorrect layer has gotten selected, which is the default. The improper layer selection in the Layers Panel may cause your edits to be concealed or the wrong sample used in your final image. The Clone Stamp tool in Photoshop Fix provides an even more effective method of copying a portion of a picture to another section of the same photo. Using your finger, press on the “source region” that you wish to replicate, and then drag it to another portion of the same picture with the brush tool.
7. Clip Studio Paint
Featuring a variety of helpful and distinctive features, Clip Studio Paint is a highly adaptable digital painting application that is great for rendering and inking work. It is simple to learn, and it comes with a large number of tools and unique brushes that allow you to paint and create any style of artwork you choose. Clip Studio Paint is the ultimate marriage of Adobe Photoshop and Paint Tool SAI. It is available for both Mac and Windows. It combines the most remarkable features of both programs for painters in a single package at the most competitive price. The tiny Paint Tool SAI application is less intimidating for beginning digital artists, and it is a beautiful beginner’s program for those just starting. Even though Clip Studio Paint is not designed for image editing, it has several ideal functions for cleaning up scans and pictures and preparing your images for printing.
8. inPixio Remove background
InPixio is a collection of independent apps that differ in specialized features and tools designed to deal with a particular photograph component. These tools assist in changing the backdrop of a photograph, removing unwanted parts from a picture, and creating beautiful collages. Suppose you are new to photography and need to quickly and easily enhance your images. In that case, InPixio is the perfect choice for you since it offers several simple-to-use features that eliminate distracting aspects from the picture, as well as a steady learning curve. Many options are available in InPixio, including light control (exposure, brightness, contrast) levels correction (curves, and color correction). Aside from that, the software offers a variety of frames and preset filters, textures, and effects, such as soft focus, noise reduction, and vignette. You can easily erase undesired information from a photograph without sacrificing image quality with the Erase feature. You have the option of deleting the highlighted zones or restoring the background. Editing the image is easier with the pick option that includes intelligent color detection. With its assistance, you may effortlessly take off any scribbles on your screenshot.
The Takeaway
You may find yourself having to share a screenshot that you would have scribbled on. Fortunately, it has become easy to remove any marks on pictures before you share them again. This article gave you five of the apps you can use to edit your screenshots without compromising the quality of your photos.
Δ
title: “How To Remove Scribbles On A Screenshot” ShowToc: true date: “2022-12-02” author: “Mary Jones”
It’s especially annoying when the scribble on the screenshot is red. If your aim is to mask this, you’re going to struggle. With red drawings, you need to use a clone or stamp tool to get rid of them. You can use techniques like blurring because it’ll still be very obvious. A high-end photoshopping software such as Photoshop, getting rid of scribbles is typically accomplished by using the background to mask over the scribbles, resulting in the scribbles disappearing and appearing in the background or screenshot that you selected. If you don’t want to download apps on your Android or iPhone, then you can use an online tool like Photopea (free version of photoshop and you can use it online) which has a clone tool as well as a stamp tool which is all you need to remove scribbles on a screenshot.
How to Remove Scribbles On a Screenshot
1. Using TouchRetouch
It’s horrifying to discover a picture or screenshots that’s been viciously scribbled on, and, understandably, to feel there’s absolutely no hope of fixing it. Well, here’s where you’re wrong. By using the app ‘TouchRetouch,’ available on iOS and Android, you can remove scribbles and drawings on a picture of your choice. The TouchRetouch app will allow you to remove doodles on photos or screenshots on your Android device as well as your iPhone. Getting rid of scribbles can also be done on high-end photoshopping software such as Photoshop and it usually consists of you using the background to mask over the scribbles so that the scribbles disappear and looks like the background or another location of the photo or screenshot that you selected. The TouchRetouch, unfortunately, costs some small change. It’s $1.99 on the day this article was published. Tap ‘Buy’ and, after you confirm your payment method and any other needed information, it will automatically download and install the TouchRetouch app straight to your Android device.
- Choose the location of the screenshot you have a desire to alter or you can take your own.
- There’s several tools to use in the TouchRetouch app, like:
Brush Lasso Erase And Settings.
Each tool, obviously, does something different, however, the tools ‘Brush’ and ‘Lasso’ are the same tool only the way they’re use is different. For example, when you want to remove scribbles from a screenshot, you can either use a big brush and get the general area, or use the lasso tool for slightly more precision.
At any rate, the tool you want to use is the ‘Brush’ tool. Go ahead and select it. You’ll get the opportunity to adjust the size of your brush to the size you need. If it’s small scribblers, go for a smaller brush size. After you’ve select the Brush tool, take your finger and highlight the scribbles you want to erase.
When you’re satisfied with what you’ve highlighted, tap ‘GO’ and the TouchRetouch will remove the object. However, since removing the object leaves a void behind (since the textures were photographed behind the object) TouchRetouch will actually snag the surrounding textures and match the void to the surrounding textures as best as possible. In fact, if you aren’t satisfied with the retexture, you can retouch the photo as many times as you want.
2. Stamp Tool Photoshop
If the background of the rest of the picture and where the scribbles are is similar, then you can use the Stamp Tool. The Clone Stamp tool allows you to paint one part of an image over another part of the same image. To use the Clone Stamp tool, click and hold the rubber stamp icon in the toolbox and select Clone Stamp Tool in the flyout menu. From here, you can adjust the brush size and shape, flow, opacity, and blending modes.
3. Clone Tool In Photoshop
You can use the clone tool in Photoshop which will allow you to use one part of the screenshot to get rid of the scribbles. In Photoshop, the clone tool erases scribbles from pictures by using the information from one part of the image to replace another part of the image which would be the scribbles. To use the clone tool, select the Clone Stamp tool and position the cursor over the area you want to clone and then Alt-click (Windows) or Option-click (Mac) to define the clone source. Once defined, position the cursor over the scribbles so that you can start to paint the cloned pixels to get rid of the scribbled.
4. Gimp
Several digital tools are included in GIMP version 2.8 that may get used to define undesired sections of your image. You should click and drag your cursor around it to determine the region’s boundary you desire to isolate. A keyboard shortcut cuts or deletes the area you have selected, leaving a blank space for you to alter your visual message once it has been created. The Clone tool copies an image or pattern using the current brush as a template. Select the tool icon from the tool palette on the left-hand side of the screen. Clone, adjust the settings you find in the palette below to establish the size of the brush and hardness, then go to the image and pick a source area to be taken to “clone” it above the doodling, and then click on the clone button. Use the Ctrl key to choose the region to be copied, then click on the first piece of the scribble inside the snapshot to select it for copying. The technique has several applications, the most notable of which is fixing damaged regions in digital photographs by “painting over” them with pixel data from other photograph parts. It takes some time to master this method, but it may be pretty effective in the hands of an experienced practitioner.
5. Adobe Photoshop Lightroom
If you attempted to cover over a portion of a screenshot using the brush tool, the resulting region would be flat and devoid of any depth, tone, or shading. As a result, the painted area would be visible to the spectator. Adobe created the Clone Stamp tool in lightroom to allow for more nuanced picture manipulation. The Clone Stamp tool in Photoshop allows you to duplicate one portion of an image onto another section of the same picture. Photographers and designers frequently use the Clone Stamp tool to eliminate undesired components from photographs they have taken or designed. Using it, for example, you may disguise flaws on people’s faces by duplicating them from another section of their skin, or you can eliminate trees from a mountain vista by copying portions of the sky over them. The Clone Stamp allows you to paint with pixels that have been cloned from one piece of a picture and pasted onto another part of it. Consequently, the corrected region is virtually indistinguishable from the remainder of the image. As a result, if you know how to use one of the Clone Stamp’s descendant tools, you can use them all. It is especially true for the Pattern Stamp and Healing Brush, all descended from the Clone Stamp.
6. Adobe Photoshop Fix
Using Photoshop, it is often possible to remove doodles from screenshots and images; however, the operations’ complexity depends on where the mark to be removed is placed. For example, if it is over an area of a monochrome photograph, it will be easier to delete than above the subject. The most common cause for the Clone Stamp to cease operating is that the incorrect layer has gotten selected, which is the default. The improper layer selection in the Layers Panel may cause your edits to be concealed or the wrong sample used in your final image. The Clone Stamp tool in Photoshop Fix provides an even more effective method of copying a portion of a picture to another section of the same photo. Using your finger, press on the “source region” that you wish to replicate, and then drag it to another portion of the same picture with the brush tool.
7. Clip Studio Paint
Featuring a variety of helpful and distinctive features, Clip Studio Paint is a highly adaptable digital painting application that is great for rendering and inking work. It is simple to learn, and it comes with a large number of tools and unique brushes that allow you to paint and create any style of artwork you choose. Clip Studio Paint is the ultimate marriage of Adobe Photoshop and Paint Tool SAI. It is available for both Mac and Windows. It combines the most remarkable features of both programs for painters in a single package at the most competitive price. The tiny Paint Tool SAI application is less intimidating for beginning digital artists, and it is a beautiful beginner’s program for those just starting. Even though Clip Studio Paint is not designed for image editing, it has several ideal functions for cleaning up scans and pictures and preparing your images for printing.
8. inPixio Remove background
InPixio is a collection of independent apps that differ in specialized features and tools designed to deal with a particular photograph component. These tools assist in changing the backdrop of a photograph, removing unwanted parts from a picture, and creating beautiful collages. Suppose you are new to photography and need to quickly and easily enhance your images. In that case, InPixio is the perfect choice for you since it offers several simple-to-use features that eliminate distracting aspects from the picture, as well as a steady learning curve. Many options are available in InPixio, including light control (exposure, brightness, contrast) levels correction (curves, and color correction). Aside from that, the software offers a variety of frames and preset filters, textures, and effects, such as soft focus, noise reduction, and vignette. You can easily erase undesired information from a photograph without sacrificing image quality with the Erase feature. You have the option of deleting the highlighted zones or restoring the background. Editing the image is easier with the pick option that includes intelligent color detection. With its assistance, you may effortlessly take off any scribbles on your screenshot.
The Takeaway
You may find yourself having to share a screenshot that you would have scribbled on. Fortunately, it has become easy to remove any marks on pictures before you share them again. This article gave you five of the apps you can use to edit your screenshots without compromising the quality of your photos.
Δ
title: “How To Remove Scribbles On A Screenshot” ShowToc: true date: “2022-11-29” author: “William Monteith”
It’s especially annoying when the scribble on the screenshot is red. If your aim is to mask this, you’re going to struggle. With red drawings, you need to use a clone or stamp tool to get rid of them. You can use techniques like blurring because it’ll still be very obvious. A high-end photoshopping software such as Photoshop, getting rid of scribbles is typically accomplished by using the background to mask over the scribbles, resulting in the scribbles disappearing and appearing in the background or screenshot that you selected. If you don’t want to download apps on your Android or iPhone, then you can use an online tool like Photopea (free version of photoshop and you can use it online) which has a clone tool as well as a stamp tool which is all you need to remove scribbles on a screenshot.
How to Remove Scribbles On a Screenshot
1. Using TouchRetouch
It’s horrifying to discover a picture or screenshots that’s been viciously scribbled on, and, understandably, to feel there’s absolutely no hope of fixing it. Well, here’s where you’re wrong. By using the app ‘TouchRetouch,’ available on iOS and Android, you can remove scribbles and drawings on a picture of your choice. The TouchRetouch app will allow you to remove doodles on photos or screenshots on your Android device as well as your iPhone. Getting rid of scribbles can also be done on high-end photoshopping software such as Photoshop and it usually consists of you using the background to mask over the scribbles so that the scribbles disappear and looks like the background or another location of the photo or screenshot that you selected. The TouchRetouch, unfortunately, costs some small change. It’s $1.99 on the day this article was published. Tap ‘Buy’ and, after you confirm your payment method and any other needed information, it will automatically download and install the TouchRetouch app straight to your Android device.
- Choose the location of the screenshot you have a desire to alter or you can take your own.
- There’s several tools to use in the TouchRetouch app, like:
Brush Lasso Erase And Settings.
Each tool, obviously, does something different, however, the tools ‘Brush’ and ‘Lasso’ are the same tool only the way they’re use is different. For example, when you want to remove scribbles from a screenshot, you can either use a big brush and get the general area, or use the lasso tool for slightly more precision.
At any rate, the tool you want to use is the ‘Brush’ tool. Go ahead and select it. You’ll get the opportunity to adjust the size of your brush to the size you need. If it’s small scribblers, go for a smaller brush size. After you’ve select the Brush tool, take your finger and highlight the scribbles you want to erase.
When you’re satisfied with what you’ve highlighted, tap ‘GO’ and the TouchRetouch will remove the object. However, since removing the object leaves a void behind (since the textures were photographed behind the object) TouchRetouch will actually snag the surrounding textures and match the void to the surrounding textures as best as possible. In fact, if you aren’t satisfied with the retexture, you can retouch the photo as many times as you want.
2. Stamp Tool Photoshop
If the background of the rest of the picture and where the scribbles are is similar, then you can use the Stamp Tool. The Clone Stamp tool allows you to paint one part of an image over another part of the same image. To use the Clone Stamp tool, click and hold the rubber stamp icon in the toolbox and select Clone Stamp Tool in the flyout menu. From here, you can adjust the brush size and shape, flow, opacity, and blending modes.
3. Clone Tool In Photoshop
You can use the clone tool in Photoshop which will allow you to use one part of the screenshot to get rid of the scribbles. In Photoshop, the clone tool erases scribbles from pictures by using the information from one part of the image to replace another part of the image which would be the scribbles. To use the clone tool, select the Clone Stamp tool and position the cursor over the area you want to clone and then Alt-click (Windows) or Option-click (Mac) to define the clone source. Once defined, position the cursor over the scribbles so that you can start to paint the cloned pixels to get rid of the scribbled.
4. Gimp
Several digital tools are included in GIMP version 2.8 that may get used to define undesired sections of your image. You should click and drag your cursor around it to determine the region’s boundary you desire to isolate. A keyboard shortcut cuts or deletes the area you have selected, leaving a blank space for you to alter your visual message once it has been created. The Clone tool copies an image or pattern using the current brush as a template. Select the tool icon from the tool palette on the left-hand side of the screen. Clone, adjust the settings you find in the palette below to establish the size of the brush and hardness, then go to the image and pick a source area to be taken to “clone” it above the doodling, and then click on the clone button. Use the Ctrl key to choose the region to be copied, then click on the first piece of the scribble inside the snapshot to select it for copying. The technique has several applications, the most notable of which is fixing damaged regions in digital photographs by “painting over” them with pixel data from other photograph parts. It takes some time to master this method, but it may be pretty effective in the hands of an experienced practitioner.
5. Adobe Photoshop Lightroom
If you attempted to cover over a portion of a screenshot using the brush tool, the resulting region would be flat and devoid of any depth, tone, or shading. As a result, the painted area would be visible to the spectator. Adobe created the Clone Stamp tool in lightroom to allow for more nuanced picture manipulation. The Clone Stamp tool in Photoshop allows you to duplicate one portion of an image onto another section of the same picture. Photographers and designers frequently use the Clone Stamp tool to eliminate undesired components from photographs they have taken or designed. Using it, for example, you may disguise flaws on people’s faces by duplicating them from another section of their skin, or you can eliminate trees from a mountain vista by copying portions of the sky over them. The Clone Stamp allows you to paint with pixels that have been cloned from one piece of a picture and pasted onto another part of it. Consequently, the corrected region is virtually indistinguishable from the remainder of the image. As a result, if you know how to use one of the Clone Stamp’s descendant tools, you can use them all. It is especially true for the Pattern Stamp and Healing Brush, all descended from the Clone Stamp.
6. Adobe Photoshop Fix
Using Photoshop, it is often possible to remove doodles from screenshots and images; however, the operations’ complexity depends on where the mark to be removed is placed. For example, if it is over an area of a monochrome photograph, it will be easier to delete than above the subject. The most common cause for the Clone Stamp to cease operating is that the incorrect layer has gotten selected, which is the default. The improper layer selection in the Layers Panel may cause your edits to be concealed or the wrong sample used in your final image. The Clone Stamp tool in Photoshop Fix provides an even more effective method of copying a portion of a picture to another section of the same photo. Using your finger, press on the “source region” that you wish to replicate, and then drag it to another portion of the same picture with the brush tool.
7. Clip Studio Paint
Featuring a variety of helpful and distinctive features, Clip Studio Paint is a highly adaptable digital painting application that is great for rendering and inking work. It is simple to learn, and it comes with a large number of tools and unique brushes that allow you to paint and create any style of artwork you choose. Clip Studio Paint is the ultimate marriage of Adobe Photoshop and Paint Tool SAI. It is available for both Mac and Windows. It combines the most remarkable features of both programs for painters in a single package at the most competitive price. The tiny Paint Tool SAI application is less intimidating for beginning digital artists, and it is a beautiful beginner’s program for those just starting. Even though Clip Studio Paint is not designed for image editing, it has several ideal functions for cleaning up scans and pictures and preparing your images for printing.
8. inPixio Remove background
InPixio is a collection of independent apps that differ in specialized features and tools designed to deal with a particular photograph component. These tools assist in changing the backdrop of a photograph, removing unwanted parts from a picture, and creating beautiful collages. Suppose you are new to photography and need to quickly and easily enhance your images. In that case, InPixio is the perfect choice for you since it offers several simple-to-use features that eliminate distracting aspects from the picture, as well as a steady learning curve. Many options are available in InPixio, including light control (exposure, brightness, contrast) levels correction (curves, and color correction). Aside from that, the software offers a variety of frames and preset filters, textures, and effects, such as soft focus, noise reduction, and vignette. You can easily erase undesired information from a photograph without sacrificing image quality with the Erase feature. You have the option of deleting the highlighted zones or restoring the background. Editing the image is easier with the pick option that includes intelligent color detection. With its assistance, you may effortlessly take off any scribbles on your screenshot.
The Takeaway
You may find yourself having to share a screenshot that you would have scribbled on. Fortunately, it has become easy to remove any marks on pictures before you share them again. This article gave you five of the apps you can use to edit your screenshots without compromising the quality of your photos.
Δ
title: “How To Remove Scribbles On A Screenshot” ShowToc: true date: “2022-10-27” author: “Shawn Rendon”
It’s especially annoying when the scribble on the screenshot is red. If your aim is to mask this, you’re going to struggle. With red drawings, you need to use a clone or stamp tool to get rid of them. You can use techniques like blurring because it’ll still be very obvious. A high-end photoshopping software such as Photoshop, getting rid of scribbles is typically accomplished by using the background to mask over the scribbles, resulting in the scribbles disappearing and appearing in the background or screenshot that you selected. If you don’t want to download apps on your Android or iPhone, then you can use an online tool like Photopea (free version of photoshop and you can use it online) which has a clone tool as well as a stamp tool which is all you need to remove scribbles on a screenshot.
How to Remove Scribbles On a Screenshot
1. Using TouchRetouch
It’s horrifying to discover a picture or screenshots that’s been viciously scribbled on, and, understandably, to feel there’s absolutely no hope of fixing it. Well, here’s where you’re wrong. By using the app ‘TouchRetouch,’ available on iOS and Android, you can remove scribbles and drawings on a picture of your choice. The TouchRetouch app will allow you to remove doodles on photos or screenshots on your Android device as well as your iPhone. Getting rid of scribbles can also be done on high-end photoshopping software such as Photoshop and it usually consists of you using the background to mask over the scribbles so that the scribbles disappear and looks like the background or another location of the photo or screenshot that you selected. The TouchRetouch, unfortunately, costs some small change. It’s $1.99 on the day this article was published. Tap ‘Buy’ and, after you confirm your payment method and any other needed information, it will automatically download and install the TouchRetouch app straight to your Android device.
- Choose the location of the screenshot you have a desire to alter or you can take your own.
- There’s several tools to use in the TouchRetouch app, like:
Brush Lasso Erase And Settings.
Each tool, obviously, does something different, however, the tools ‘Brush’ and ‘Lasso’ are the same tool only the way they’re use is different. For example, when you want to remove scribbles from a screenshot, you can either use a big brush and get the general area, or use the lasso tool for slightly more precision.
At any rate, the tool you want to use is the ‘Brush’ tool. Go ahead and select it. You’ll get the opportunity to adjust the size of your brush to the size you need. If it’s small scribblers, go for a smaller brush size. After you’ve select the Brush tool, take your finger and highlight the scribbles you want to erase.
When you’re satisfied with what you’ve highlighted, tap ‘GO’ and the TouchRetouch will remove the object. However, since removing the object leaves a void behind (since the textures were photographed behind the object) TouchRetouch will actually snag the surrounding textures and match the void to the surrounding textures as best as possible. In fact, if you aren’t satisfied with the retexture, you can retouch the photo as many times as you want.
2. Stamp Tool Photoshop
If the background of the rest of the picture and where the scribbles are is similar, then you can use the Stamp Tool. The Clone Stamp tool allows you to paint one part of an image over another part of the same image. To use the Clone Stamp tool, click and hold the rubber stamp icon in the toolbox and select Clone Stamp Tool in the flyout menu. From here, you can adjust the brush size and shape, flow, opacity, and blending modes.
3. Clone Tool In Photoshop
You can use the clone tool in Photoshop which will allow you to use one part of the screenshot to get rid of the scribbles. In Photoshop, the clone tool erases scribbles from pictures by using the information from one part of the image to replace another part of the image which would be the scribbles. To use the clone tool, select the Clone Stamp tool and position the cursor over the area you want to clone and then Alt-click (Windows) or Option-click (Mac) to define the clone source. Once defined, position the cursor over the scribbles so that you can start to paint the cloned pixels to get rid of the scribbled.
4. Gimp
Several digital tools are included in GIMP version 2.8 that may get used to define undesired sections of your image. You should click and drag your cursor around it to determine the region’s boundary you desire to isolate. A keyboard shortcut cuts or deletes the area you have selected, leaving a blank space for you to alter your visual message once it has been created. The Clone tool copies an image or pattern using the current brush as a template. Select the tool icon from the tool palette on the left-hand side of the screen. Clone, adjust the settings you find in the palette below to establish the size of the brush and hardness, then go to the image and pick a source area to be taken to “clone” it above the doodling, and then click on the clone button. Use the Ctrl key to choose the region to be copied, then click on the first piece of the scribble inside the snapshot to select it for copying. The technique has several applications, the most notable of which is fixing damaged regions in digital photographs by “painting over” them with pixel data from other photograph parts. It takes some time to master this method, but it may be pretty effective in the hands of an experienced practitioner.
5. Adobe Photoshop Lightroom
If you attempted to cover over a portion of a screenshot using the brush tool, the resulting region would be flat and devoid of any depth, tone, or shading. As a result, the painted area would be visible to the spectator. Adobe created the Clone Stamp tool in lightroom to allow for more nuanced picture manipulation. The Clone Stamp tool in Photoshop allows you to duplicate one portion of an image onto another section of the same picture. Photographers and designers frequently use the Clone Stamp tool to eliminate undesired components from photographs they have taken or designed. Using it, for example, you may disguise flaws on people’s faces by duplicating them from another section of their skin, or you can eliminate trees from a mountain vista by copying portions of the sky over them. The Clone Stamp allows you to paint with pixels that have been cloned from one piece of a picture and pasted onto another part of it. Consequently, the corrected region is virtually indistinguishable from the remainder of the image. As a result, if you know how to use one of the Clone Stamp’s descendant tools, you can use them all. It is especially true for the Pattern Stamp and Healing Brush, all descended from the Clone Stamp.
6. Adobe Photoshop Fix
Using Photoshop, it is often possible to remove doodles from screenshots and images; however, the operations’ complexity depends on where the mark to be removed is placed. For example, if it is over an area of a monochrome photograph, it will be easier to delete than above the subject. The most common cause for the Clone Stamp to cease operating is that the incorrect layer has gotten selected, which is the default. The improper layer selection in the Layers Panel may cause your edits to be concealed or the wrong sample used in your final image. The Clone Stamp tool in Photoshop Fix provides an even more effective method of copying a portion of a picture to another section of the same photo. Using your finger, press on the “source region” that you wish to replicate, and then drag it to another portion of the same picture with the brush tool.
7. Clip Studio Paint
Featuring a variety of helpful and distinctive features, Clip Studio Paint is a highly adaptable digital painting application that is great for rendering and inking work. It is simple to learn, and it comes with a large number of tools and unique brushes that allow you to paint and create any style of artwork you choose. Clip Studio Paint is the ultimate marriage of Adobe Photoshop and Paint Tool SAI. It is available for both Mac and Windows. It combines the most remarkable features of both programs for painters in a single package at the most competitive price. The tiny Paint Tool SAI application is less intimidating for beginning digital artists, and it is a beautiful beginner’s program for those just starting. Even though Clip Studio Paint is not designed for image editing, it has several ideal functions for cleaning up scans and pictures and preparing your images for printing.
8. inPixio Remove background
InPixio is a collection of independent apps that differ in specialized features and tools designed to deal with a particular photograph component. These tools assist in changing the backdrop of a photograph, removing unwanted parts from a picture, and creating beautiful collages. Suppose you are new to photography and need to quickly and easily enhance your images. In that case, InPixio is the perfect choice for you since it offers several simple-to-use features that eliminate distracting aspects from the picture, as well as a steady learning curve. Many options are available in InPixio, including light control (exposure, brightness, contrast) levels correction (curves, and color correction). Aside from that, the software offers a variety of frames and preset filters, textures, and effects, such as soft focus, noise reduction, and vignette. You can easily erase undesired information from a photograph without sacrificing image quality with the Erase feature. You have the option of deleting the highlighted zones or restoring the background. Editing the image is easier with the pick option that includes intelligent color detection. With its assistance, you may effortlessly take off any scribbles on your screenshot.
The Takeaway
You may find yourself having to share a screenshot that you would have scribbled on. Fortunately, it has become easy to remove any marks on pictures before you share them again. This article gave you five of the apps you can use to edit your screenshots without compromising the quality of your photos.
Δ
title: “How To Remove Scribbles On A Screenshot” ShowToc: true date: “2022-12-09” author: “Elizabeth Blews”
It’s especially annoying when the scribble on the screenshot is red. If your aim is to mask this, you’re going to struggle. With red drawings, you need to use a clone or stamp tool to get rid of them. You can use techniques like blurring because it’ll still be very obvious. A high-end photoshopping software such as Photoshop, getting rid of scribbles is typically accomplished by using the background to mask over the scribbles, resulting in the scribbles disappearing and appearing in the background or screenshot that you selected. If you don’t want to download apps on your Android or iPhone, then you can use an online tool like Photopea (free version of photoshop and you can use it online) which has a clone tool as well as a stamp tool which is all you need to remove scribbles on a screenshot.
How to Remove Scribbles On a Screenshot
1. Using TouchRetouch
It’s horrifying to discover a picture or screenshots that’s been viciously scribbled on, and, understandably, to feel there’s absolutely no hope of fixing it. Well, here’s where you’re wrong. By using the app ‘TouchRetouch,’ available on iOS and Android, you can remove scribbles and drawings on a picture of your choice. The TouchRetouch app will allow you to remove doodles on photos or screenshots on your Android device as well as your iPhone. Getting rid of scribbles can also be done on high-end photoshopping software such as Photoshop and it usually consists of you using the background to mask over the scribbles so that the scribbles disappear and looks like the background or another location of the photo or screenshot that you selected. The TouchRetouch, unfortunately, costs some small change. It’s $1.99 on the day this article was published. Tap ‘Buy’ and, after you confirm your payment method and any other needed information, it will automatically download and install the TouchRetouch app straight to your Android device.
- Choose the location of the screenshot you have a desire to alter or you can take your own.
- There’s several tools to use in the TouchRetouch app, like:
Brush Lasso Erase And Settings.
Each tool, obviously, does something different, however, the tools ‘Brush’ and ‘Lasso’ are the same tool only the way they’re use is different. For example, when you want to remove scribbles from a screenshot, you can either use a big brush and get the general area, or use the lasso tool for slightly more precision.
At any rate, the tool you want to use is the ‘Brush’ tool. Go ahead and select it. You’ll get the opportunity to adjust the size of your brush to the size you need. If it’s small scribblers, go for a smaller brush size. After you’ve select the Brush tool, take your finger and highlight the scribbles you want to erase.
When you’re satisfied with what you’ve highlighted, tap ‘GO’ and the TouchRetouch will remove the object. However, since removing the object leaves a void behind (since the textures were photographed behind the object) TouchRetouch will actually snag the surrounding textures and match the void to the surrounding textures as best as possible. In fact, if you aren’t satisfied with the retexture, you can retouch the photo as many times as you want.
2. Stamp Tool Photoshop
If the background of the rest of the picture and where the scribbles are is similar, then you can use the Stamp Tool. The Clone Stamp tool allows you to paint one part of an image over another part of the same image. To use the Clone Stamp tool, click and hold the rubber stamp icon in the toolbox and select Clone Stamp Tool in the flyout menu. From here, you can adjust the brush size and shape, flow, opacity, and blending modes.
3. Clone Tool In Photoshop
You can use the clone tool in Photoshop which will allow you to use one part of the screenshot to get rid of the scribbles. In Photoshop, the clone tool erases scribbles from pictures by using the information from one part of the image to replace another part of the image which would be the scribbles. To use the clone tool, select the Clone Stamp tool and position the cursor over the area you want to clone and then Alt-click (Windows) or Option-click (Mac) to define the clone source. Once defined, position the cursor over the scribbles so that you can start to paint the cloned pixels to get rid of the scribbled.
4. Gimp
Several digital tools are included in GIMP version 2.8 that may get used to define undesired sections of your image. You should click and drag your cursor around it to determine the region’s boundary you desire to isolate. A keyboard shortcut cuts or deletes the area you have selected, leaving a blank space for you to alter your visual message once it has been created. The Clone tool copies an image or pattern using the current brush as a template. Select the tool icon from the tool palette on the left-hand side of the screen. Clone, adjust the settings you find in the palette below to establish the size of the brush and hardness, then go to the image and pick a source area to be taken to “clone” it above the doodling, and then click on the clone button. Use the Ctrl key to choose the region to be copied, then click on the first piece of the scribble inside the snapshot to select it for copying. The technique has several applications, the most notable of which is fixing damaged regions in digital photographs by “painting over” them with pixel data from other photograph parts. It takes some time to master this method, but it may be pretty effective in the hands of an experienced practitioner.
5. Adobe Photoshop Lightroom
If you attempted to cover over a portion of a screenshot using the brush tool, the resulting region would be flat and devoid of any depth, tone, or shading. As a result, the painted area would be visible to the spectator. Adobe created the Clone Stamp tool in lightroom to allow for more nuanced picture manipulation. The Clone Stamp tool in Photoshop allows you to duplicate one portion of an image onto another section of the same picture. Photographers and designers frequently use the Clone Stamp tool to eliminate undesired components from photographs they have taken or designed. Using it, for example, you may disguise flaws on people’s faces by duplicating them from another section of their skin, or you can eliminate trees from a mountain vista by copying portions of the sky over them. The Clone Stamp allows you to paint with pixels that have been cloned from one piece of a picture and pasted onto another part of it. Consequently, the corrected region is virtually indistinguishable from the remainder of the image. As a result, if you know how to use one of the Clone Stamp’s descendant tools, you can use them all. It is especially true for the Pattern Stamp and Healing Brush, all descended from the Clone Stamp.
6. Adobe Photoshop Fix
Using Photoshop, it is often possible to remove doodles from screenshots and images; however, the operations’ complexity depends on where the mark to be removed is placed. For example, if it is over an area of a monochrome photograph, it will be easier to delete than above the subject. The most common cause for the Clone Stamp to cease operating is that the incorrect layer has gotten selected, which is the default. The improper layer selection in the Layers Panel may cause your edits to be concealed or the wrong sample used in your final image. The Clone Stamp tool in Photoshop Fix provides an even more effective method of copying a portion of a picture to another section of the same photo. Using your finger, press on the “source region” that you wish to replicate, and then drag it to another portion of the same picture with the brush tool.
7. Clip Studio Paint
Featuring a variety of helpful and distinctive features, Clip Studio Paint is a highly adaptable digital painting application that is great for rendering and inking work. It is simple to learn, and it comes with a large number of tools and unique brushes that allow you to paint and create any style of artwork you choose. Clip Studio Paint is the ultimate marriage of Adobe Photoshop and Paint Tool SAI. It is available for both Mac and Windows. It combines the most remarkable features of both programs for painters in a single package at the most competitive price. The tiny Paint Tool SAI application is less intimidating for beginning digital artists, and it is a beautiful beginner’s program for those just starting. Even though Clip Studio Paint is not designed for image editing, it has several ideal functions for cleaning up scans and pictures and preparing your images for printing.
8. inPixio Remove background
InPixio is a collection of independent apps that differ in specialized features and tools designed to deal with a particular photograph component. These tools assist in changing the backdrop of a photograph, removing unwanted parts from a picture, and creating beautiful collages. Suppose you are new to photography and need to quickly and easily enhance your images. In that case, InPixio is the perfect choice for you since it offers several simple-to-use features that eliminate distracting aspects from the picture, as well as a steady learning curve. Many options are available in InPixio, including light control (exposure, brightness, contrast) levels correction (curves, and color correction). Aside from that, the software offers a variety of frames and preset filters, textures, and effects, such as soft focus, noise reduction, and vignette. You can easily erase undesired information from a photograph without sacrificing image quality with the Erase feature. You have the option of deleting the highlighted zones or restoring the background. Editing the image is easier with the pick option that includes intelligent color detection. With its assistance, you may effortlessly take off any scribbles on your screenshot.
The Takeaway
You may find yourself having to share a screenshot that you would have scribbled on. Fortunately, it has become easy to remove any marks on pictures before you share them again. This article gave you five of the apps you can use to edit your screenshots without compromising the quality of your photos.
Δ
title: “How To Remove Scribbles On A Screenshot” ShowToc: true date: “2022-11-19” author: “Betty Rainer”
It’s especially annoying when the scribble on the screenshot is red. If your aim is to mask this, you’re going to struggle. With red drawings, you need to use a clone or stamp tool to get rid of them. You can use techniques like blurring because it’ll still be very obvious. A high-end photoshopping software such as Photoshop, getting rid of scribbles is typically accomplished by using the background to mask over the scribbles, resulting in the scribbles disappearing and appearing in the background or screenshot that you selected. If you don’t want to download apps on your Android or iPhone, then you can use an online tool like Photopea (free version of photoshop and you can use it online) which has a clone tool as well as a stamp tool which is all you need to remove scribbles on a screenshot.
How to Remove Scribbles On a Screenshot
1. Using TouchRetouch
It’s horrifying to discover a picture or screenshots that’s been viciously scribbled on, and, understandably, to feel there’s absolutely no hope of fixing it. Well, here’s where you’re wrong. By using the app ‘TouchRetouch,’ available on iOS and Android, you can remove scribbles and drawings on a picture of your choice. The TouchRetouch app will allow you to remove doodles on photos or screenshots on your Android device as well as your iPhone. Getting rid of scribbles can also be done on high-end photoshopping software such as Photoshop and it usually consists of you using the background to mask over the scribbles so that the scribbles disappear and looks like the background or another location of the photo or screenshot that you selected. The TouchRetouch, unfortunately, costs some small change. It’s $1.99 on the day this article was published. Tap ‘Buy’ and, after you confirm your payment method and any other needed information, it will automatically download and install the TouchRetouch app straight to your Android device.
- Choose the location of the screenshot you have a desire to alter or you can take your own.
- There’s several tools to use in the TouchRetouch app, like:
Brush Lasso Erase And Settings.
Each tool, obviously, does something different, however, the tools ‘Brush’ and ‘Lasso’ are the same tool only the way they’re use is different. For example, when you want to remove scribbles from a screenshot, you can either use a big brush and get the general area, or use the lasso tool for slightly more precision.
At any rate, the tool you want to use is the ‘Brush’ tool. Go ahead and select it. You’ll get the opportunity to adjust the size of your brush to the size you need. If it’s small scribblers, go for a smaller brush size. After you’ve select the Brush tool, take your finger and highlight the scribbles you want to erase.
When you’re satisfied with what you’ve highlighted, tap ‘GO’ and the TouchRetouch will remove the object. However, since removing the object leaves a void behind (since the textures were photographed behind the object) TouchRetouch will actually snag the surrounding textures and match the void to the surrounding textures as best as possible. In fact, if you aren’t satisfied with the retexture, you can retouch the photo as many times as you want.
2. Stamp Tool Photoshop
If the background of the rest of the picture and where the scribbles are is similar, then you can use the Stamp Tool. The Clone Stamp tool allows you to paint one part of an image over another part of the same image. To use the Clone Stamp tool, click and hold the rubber stamp icon in the toolbox and select Clone Stamp Tool in the flyout menu. From here, you can adjust the brush size and shape, flow, opacity, and blending modes.
3. Clone Tool In Photoshop
You can use the clone tool in Photoshop which will allow you to use one part of the screenshot to get rid of the scribbles. In Photoshop, the clone tool erases scribbles from pictures by using the information from one part of the image to replace another part of the image which would be the scribbles. To use the clone tool, select the Clone Stamp tool and position the cursor over the area you want to clone and then Alt-click (Windows) or Option-click (Mac) to define the clone source. Once defined, position the cursor over the scribbles so that you can start to paint the cloned pixels to get rid of the scribbled.
4. Gimp
Several digital tools are included in GIMP version 2.8 that may get used to define undesired sections of your image. You should click and drag your cursor around it to determine the region’s boundary you desire to isolate. A keyboard shortcut cuts or deletes the area you have selected, leaving a blank space for you to alter your visual message once it has been created. The Clone tool copies an image or pattern using the current brush as a template. Select the tool icon from the tool palette on the left-hand side of the screen. Clone, adjust the settings you find in the palette below to establish the size of the brush and hardness, then go to the image and pick a source area to be taken to “clone” it above the doodling, and then click on the clone button. Use the Ctrl key to choose the region to be copied, then click on the first piece of the scribble inside the snapshot to select it for copying. The technique has several applications, the most notable of which is fixing damaged regions in digital photographs by “painting over” them with pixel data from other photograph parts. It takes some time to master this method, but it may be pretty effective in the hands of an experienced practitioner.
5. Adobe Photoshop Lightroom
If you attempted to cover over a portion of a screenshot using the brush tool, the resulting region would be flat and devoid of any depth, tone, or shading. As a result, the painted area would be visible to the spectator. Adobe created the Clone Stamp tool in lightroom to allow for more nuanced picture manipulation. The Clone Stamp tool in Photoshop allows you to duplicate one portion of an image onto another section of the same picture. Photographers and designers frequently use the Clone Stamp tool to eliminate undesired components from photographs they have taken or designed. Using it, for example, you may disguise flaws on people’s faces by duplicating them from another section of their skin, or you can eliminate trees from a mountain vista by copying portions of the sky over them. The Clone Stamp allows you to paint with pixels that have been cloned from one piece of a picture and pasted onto another part of it. Consequently, the corrected region is virtually indistinguishable from the remainder of the image. As a result, if you know how to use one of the Clone Stamp’s descendant tools, you can use them all. It is especially true for the Pattern Stamp and Healing Brush, all descended from the Clone Stamp.
6. Adobe Photoshop Fix
Using Photoshop, it is often possible to remove doodles from screenshots and images; however, the operations’ complexity depends on where the mark to be removed is placed. For example, if it is over an area of a monochrome photograph, it will be easier to delete than above the subject. The most common cause for the Clone Stamp to cease operating is that the incorrect layer has gotten selected, which is the default. The improper layer selection in the Layers Panel may cause your edits to be concealed or the wrong sample used in your final image. The Clone Stamp tool in Photoshop Fix provides an even more effective method of copying a portion of a picture to another section of the same photo. Using your finger, press on the “source region” that you wish to replicate, and then drag it to another portion of the same picture with the brush tool.
7. Clip Studio Paint
Featuring a variety of helpful and distinctive features, Clip Studio Paint is a highly adaptable digital painting application that is great for rendering and inking work. It is simple to learn, and it comes with a large number of tools and unique brushes that allow you to paint and create any style of artwork you choose. Clip Studio Paint is the ultimate marriage of Adobe Photoshop and Paint Tool SAI. It is available for both Mac and Windows. It combines the most remarkable features of both programs for painters in a single package at the most competitive price. The tiny Paint Tool SAI application is less intimidating for beginning digital artists, and it is a beautiful beginner’s program for those just starting. Even though Clip Studio Paint is not designed for image editing, it has several ideal functions for cleaning up scans and pictures and preparing your images for printing.
8. inPixio Remove background
InPixio is a collection of independent apps that differ in specialized features and tools designed to deal with a particular photograph component. These tools assist in changing the backdrop of a photograph, removing unwanted parts from a picture, and creating beautiful collages. Suppose you are new to photography and need to quickly and easily enhance your images. In that case, InPixio is the perfect choice for you since it offers several simple-to-use features that eliminate distracting aspects from the picture, as well as a steady learning curve. Many options are available in InPixio, including light control (exposure, brightness, contrast) levels correction (curves, and color correction). Aside from that, the software offers a variety of frames and preset filters, textures, and effects, such as soft focus, noise reduction, and vignette. You can easily erase undesired information from a photograph without sacrificing image quality with the Erase feature. You have the option of deleting the highlighted zones or restoring the background. Editing the image is easier with the pick option that includes intelligent color detection. With its assistance, you may effortlessly take off any scribbles on your screenshot.
The Takeaway
You may find yourself having to share a screenshot that you would have scribbled on. Fortunately, it has become easy to remove any marks on pictures before you share them again. This article gave you five of the apps you can use to edit your screenshots without compromising the quality of your photos.
Δ
title: “How To Remove Scribbles On A Screenshot” ShowToc: true date: “2022-12-16” author: “Justin Simpson”
It’s especially annoying when the scribble on the screenshot is red. If your aim is to mask this, you’re going to struggle. With red drawings, you need to use a clone or stamp tool to get rid of them. You can use techniques like blurring because it’ll still be very obvious. A high-end photoshopping software such as Photoshop, getting rid of scribbles is typically accomplished by using the background to mask over the scribbles, resulting in the scribbles disappearing and appearing in the background or screenshot that you selected. If you don’t want to download apps on your Android or iPhone, then you can use an online tool like Photopea (free version of photoshop and you can use it online) which has a clone tool as well as a stamp tool which is all you need to remove scribbles on a screenshot.
How to Remove Scribbles On a Screenshot
1. Using TouchRetouch
It’s horrifying to discover a picture or screenshots that’s been viciously scribbled on, and, understandably, to feel there’s absolutely no hope of fixing it. Well, here’s where you’re wrong. By using the app ‘TouchRetouch,’ available on iOS and Android, you can remove scribbles and drawings on a picture of your choice. The TouchRetouch app will allow you to remove doodles on photos or screenshots on your Android device as well as your iPhone. Getting rid of scribbles can also be done on high-end photoshopping software such as Photoshop and it usually consists of you using the background to mask over the scribbles so that the scribbles disappear and looks like the background or another location of the photo or screenshot that you selected. The TouchRetouch, unfortunately, costs some small change. It’s $1.99 on the day this article was published. Tap ‘Buy’ and, after you confirm your payment method and any other needed information, it will automatically download and install the TouchRetouch app straight to your Android device.
- Choose the location of the screenshot you have a desire to alter or you can take your own.
- There’s several tools to use in the TouchRetouch app, like:
Brush Lasso Erase And Settings.
Each tool, obviously, does something different, however, the tools ‘Brush’ and ‘Lasso’ are the same tool only the way they’re use is different. For example, when you want to remove scribbles from a screenshot, you can either use a big brush and get the general area, or use the lasso tool for slightly more precision.
At any rate, the tool you want to use is the ‘Brush’ tool. Go ahead and select it. You’ll get the opportunity to adjust the size of your brush to the size you need. If it’s small scribblers, go for a smaller brush size. After you’ve select the Brush tool, take your finger and highlight the scribbles you want to erase.
When you’re satisfied with what you’ve highlighted, tap ‘GO’ and the TouchRetouch will remove the object. However, since removing the object leaves a void behind (since the textures were photographed behind the object) TouchRetouch will actually snag the surrounding textures and match the void to the surrounding textures as best as possible. In fact, if you aren’t satisfied with the retexture, you can retouch the photo as many times as you want.
2. Stamp Tool Photoshop
If the background of the rest of the picture and where the scribbles are is similar, then you can use the Stamp Tool. The Clone Stamp tool allows you to paint one part of an image over another part of the same image. To use the Clone Stamp tool, click and hold the rubber stamp icon in the toolbox and select Clone Stamp Tool in the flyout menu. From here, you can adjust the brush size and shape, flow, opacity, and blending modes.
3. Clone Tool In Photoshop
You can use the clone tool in Photoshop which will allow you to use one part of the screenshot to get rid of the scribbles. In Photoshop, the clone tool erases scribbles from pictures by using the information from one part of the image to replace another part of the image which would be the scribbles. To use the clone tool, select the Clone Stamp tool and position the cursor over the area you want to clone and then Alt-click (Windows) or Option-click (Mac) to define the clone source. Once defined, position the cursor over the scribbles so that you can start to paint the cloned pixels to get rid of the scribbled.
4. Gimp
Several digital tools are included in GIMP version 2.8 that may get used to define undesired sections of your image. You should click and drag your cursor around it to determine the region’s boundary you desire to isolate. A keyboard shortcut cuts or deletes the area you have selected, leaving a blank space for you to alter your visual message once it has been created. The Clone tool copies an image or pattern using the current brush as a template. Select the tool icon from the tool palette on the left-hand side of the screen. Clone, adjust the settings you find in the palette below to establish the size of the brush and hardness, then go to the image and pick a source area to be taken to “clone” it above the doodling, and then click on the clone button. Use the Ctrl key to choose the region to be copied, then click on the first piece of the scribble inside the snapshot to select it for copying. The technique has several applications, the most notable of which is fixing damaged regions in digital photographs by “painting over” them with pixel data from other photograph parts. It takes some time to master this method, but it may be pretty effective in the hands of an experienced practitioner.
5. Adobe Photoshop Lightroom
If you attempted to cover over a portion of a screenshot using the brush tool, the resulting region would be flat and devoid of any depth, tone, or shading. As a result, the painted area would be visible to the spectator. Adobe created the Clone Stamp tool in lightroom to allow for more nuanced picture manipulation. The Clone Stamp tool in Photoshop allows you to duplicate one portion of an image onto another section of the same picture. Photographers and designers frequently use the Clone Stamp tool to eliminate undesired components from photographs they have taken or designed. Using it, for example, you may disguise flaws on people’s faces by duplicating them from another section of their skin, or you can eliminate trees from a mountain vista by copying portions of the sky over them. The Clone Stamp allows you to paint with pixels that have been cloned from one piece of a picture and pasted onto another part of it. Consequently, the corrected region is virtually indistinguishable from the remainder of the image. As a result, if you know how to use one of the Clone Stamp’s descendant tools, you can use them all. It is especially true for the Pattern Stamp and Healing Brush, all descended from the Clone Stamp.
6. Adobe Photoshop Fix
Using Photoshop, it is often possible to remove doodles from screenshots and images; however, the operations’ complexity depends on where the mark to be removed is placed. For example, if it is over an area of a monochrome photograph, it will be easier to delete than above the subject. The most common cause for the Clone Stamp to cease operating is that the incorrect layer has gotten selected, which is the default. The improper layer selection in the Layers Panel may cause your edits to be concealed or the wrong sample used in your final image. The Clone Stamp tool in Photoshop Fix provides an even more effective method of copying a portion of a picture to another section of the same photo. Using your finger, press on the “source region” that you wish to replicate, and then drag it to another portion of the same picture with the brush tool.
7. Clip Studio Paint
Featuring a variety of helpful and distinctive features, Clip Studio Paint is a highly adaptable digital painting application that is great for rendering and inking work. It is simple to learn, and it comes with a large number of tools and unique brushes that allow you to paint and create any style of artwork you choose. Clip Studio Paint is the ultimate marriage of Adobe Photoshop and Paint Tool SAI. It is available for both Mac and Windows. It combines the most remarkable features of both programs for painters in a single package at the most competitive price. The tiny Paint Tool SAI application is less intimidating for beginning digital artists, and it is a beautiful beginner’s program for those just starting. Even though Clip Studio Paint is not designed for image editing, it has several ideal functions for cleaning up scans and pictures and preparing your images for printing.
8. inPixio Remove background
InPixio is a collection of independent apps that differ in specialized features and tools designed to deal with a particular photograph component. These tools assist in changing the backdrop of a photograph, removing unwanted parts from a picture, and creating beautiful collages. Suppose you are new to photography and need to quickly and easily enhance your images. In that case, InPixio is the perfect choice for you since it offers several simple-to-use features that eliminate distracting aspects from the picture, as well as a steady learning curve. Many options are available in InPixio, including light control (exposure, brightness, contrast) levels correction (curves, and color correction). Aside from that, the software offers a variety of frames and preset filters, textures, and effects, such as soft focus, noise reduction, and vignette. You can easily erase undesired information from a photograph without sacrificing image quality with the Erase feature. You have the option of deleting the highlighted zones or restoring the background. Editing the image is easier with the pick option that includes intelligent color detection. With its assistance, you may effortlessly take off any scribbles on your screenshot.
The Takeaway
You may find yourself having to share a screenshot that you would have scribbled on. Fortunately, it has become easy to remove any marks on pictures before you share them again. This article gave you five of the apps you can use to edit your screenshots without compromising the quality of your photos.
Δ
title: “How To Remove Scribbles On A Screenshot” ShowToc: true date: “2022-11-03” author: “Nellie Smith”
It’s especially annoying when the scribble on the screenshot is red. If your aim is to mask this, you’re going to struggle. With red drawings, you need to use a clone or stamp tool to get rid of them. You can use techniques like blurring because it’ll still be very obvious. A high-end photoshopping software such as Photoshop, getting rid of scribbles is typically accomplished by using the background to mask over the scribbles, resulting in the scribbles disappearing and appearing in the background or screenshot that you selected. If you don’t want to download apps on your Android or iPhone, then you can use an online tool like Photopea (free version of photoshop and you can use it online) which has a clone tool as well as a stamp tool which is all you need to remove scribbles on a screenshot.
How to Remove Scribbles On a Screenshot
1. Using TouchRetouch
It’s horrifying to discover a picture or screenshots that’s been viciously scribbled on, and, understandably, to feel there’s absolutely no hope of fixing it. Well, here’s where you’re wrong. By using the app ‘TouchRetouch,’ available on iOS and Android, you can remove scribbles and drawings on a picture of your choice. The TouchRetouch app will allow you to remove doodles on photos or screenshots on your Android device as well as your iPhone. Getting rid of scribbles can also be done on high-end photoshopping software such as Photoshop and it usually consists of you using the background to mask over the scribbles so that the scribbles disappear and looks like the background or another location of the photo or screenshot that you selected. The TouchRetouch, unfortunately, costs some small change. It’s $1.99 on the day this article was published. Tap ‘Buy’ and, after you confirm your payment method and any other needed information, it will automatically download and install the TouchRetouch app straight to your Android device.
- Choose the location of the screenshot you have a desire to alter or you can take your own.
- There’s several tools to use in the TouchRetouch app, like:
Brush Lasso Erase And Settings.
Each tool, obviously, does something different, however, the tools ‘Brush’ and ‘Lasso’ are the same tool only the way they’re use is different. For example, when you want to remove scribbles from a screenshot, you can either use a big brush and get the general area, or use the lasso tool for slightly more precision.
At any rate, the tool you want to use is the ‘Brush’ tool. Go ahead and select it. You’ll get the opportunity to adjust the size of your brush to the size you need. If it’s small scribblers, go for a smaller brush size. After you’ve select the Brush tool, take your finger and highlight the scribbles you want to erase.
When you’re satisfied with what you’ve highlighted, tap ‘GO’ and the TouchRetouch will remove the object. However, since removing the object leaves a void behind (since the textures were photographed behind the object) TouchRetouch will actually snag the surrounding textures and match the void to the surrounding textures as best as possible. In fact, if you aren’t satisfied with the retexture, you can retouch the photo as many times as you want.
2. Stamp Tool Photoshop
If the background of the rest of the picture and where the scribbles are is similar, then you can use the Stamp Tool. The Clone Stamp tool allows you to paint one part of an image over another part of the same image. To use the Clone Stamp tool, click and hold the rubber stamp icon in the toolbox and select Clone Stamp Tool in the flyout menu. From here, you can adjust the brush size and shape, flow, opacity, and blending modes.
3. Clone Tool In Photoshop
You can use the clone tool in Photoshop which will allow you to use one part of the screenshot to get rid of the scribbles. In Photoshop, the clone tool erases scribbles from pictures by using the information from one part of the image to replace another part of the image which would be the scribbles. To use the clone tool, select the Clone Stamp tool and position the cursor over the area you want to clone and then Alt-click (Windows) or Option-click (Mac) to define the clone source. Once defined, position the cursor over the scribbles so that you can start to paint the cloned pixels to get rid of the scribbled.
4. Gimp
Several digital tools are included in GIMP version 2.8 that may get used to define undesired sections of your image. You should click and drag your cursor around it to determine the region’s boundary you desire to isolate. A keyboard shortcut cuts or deletes the area you have selected, leaving a blank space for you to alter your visual message once it has been created. The Clone tool copies an image or pattern using the current brush as a template. Select the tool icon from the tool palette on the left-hand side of the screen. Clone, adjust the settings you find in the palette below to establish the size of the brush and hardness, then go to the image and pick a source area to be taken to “clone” it above the doodling, and then click on the clone button. Use the Ctrl key to choose the region to be copied, then click on the first piece of the scribble inside the snapshot to select it for copying. The technique has several applications, the most notable of which is fixing damaged regions in digital photographs by “painting over” them with pixel data from other photograph parts. It takes some time to master this method, but it may be pretty effective in the hands of an experienced practitioner.
5. Adobe Photoshop Lightroom
If you attempted to cover over a portion of a screenshot using the brush tool, the resulting region would be flat and devoid of any depth, tone, or shading. As a result, the painted area would be visible to the spectator. Adobe created the Clone Stamp tool in lightroom to allow for more nuanced picture manipulation. The Clone Stamp tool in Photoshop allows you to duplicate one portion of an image onto another section of the same picture. Photographers and designers frequently use the Clone Stamp tool to eliminate undesired components from photographs they have taken or designed. Using it, for example, you may disguise flaws on people’s faces by duplicating them from another section of their skin, or you can eliminate trees from a mountain vista by copying portions of the sky over them. The Clone Stamp allows you to paint with pixels that have been cloned from one piece of a picture and pasted onto another part of it. Consequently, the corrected region is virtually indistinguishable from the remainder of the image. As a result, if you know how to use one of the Clone Stamp’s descendant tools, you can use them all. It is especially true for the Pattern Stamp and Healing Brush, all descended from the Clone Stamp.
6. Adobe Photoshop Fix
Using Photoshop, it is often possible to remove doodles from screenshots and images; however, the operations’ complexity depends on where the mark to be removed is placed. For example, if it is over an area of a monochrome photograph, it will be easier to delete than above the subject. The most common cause for the Clone Stamp to cease operating is that the incorrect layer has gotten selected, which is the default. The improper layer selection in the Layers Panel may cause your edits to be concealed or the wrong sample used in your final image. The Clone Stamp tool in Photoshop Fix provides an even more effective method of copying a portion of a picture to another section of the same photo. Using your finger, press on the “source region” that you wish to replicate, and then drag it to another portion of the same picture with the brush tool.
7. Clip Studio Paint
Featuring a variety of helpful and distinctive features, Clip Studio Paint is a highly adaptable digital painting application that is great for rendering and inking work. It is simple to learn, and it comes with a large number of tools and unique brushes that allow you to paint and create any style of artwork you choose. Clip Studio Paint is the ultimate marriage of Adobe Photoshop and Paint Tool SAI. It is available for both Mac and Windows. It combines the most remarkable features of both programs for painters in a single package at the most competitive price. The tiny Paint Tool SAI application is less intimidating for beginning digital artists, and it is a beautiful beginner’s program for those just starting. Even though Clip Studio Paint is not designed for image editing, it has several ideal functions for cleaning up scans and pictures and preparing your images for printing.
8. inPixio Remove background
InPixio is a collection of independent apps that differ in specialized features and tools designed to deal with a particular photograph component. These tools assist in changing the backdrop of a photograph, removing unwanted parts from a picture, and creating beautiful collages. Suppose you are new to photography and need to quickly and easily enhance your images. In that case, InPixio is the perfect choice for you since it offers several simple-to-use features that eliminate distracting aspects from the picture, as well as a steady learning curve. Many options are available in InPixio, including light control (exposure, brightness, contrast) levels correction (curves, and color correction). Aside from that, the software offers a variety of frames and preset filters, textures, and effects, such as soft focus, noise reduction, and vignette. You can easily erase undesired information from a photograph without sacrificing image quality with the Erase feature. You have the option of deleting the highlighted zones or restoring the background. Editing the image is easier with the pick option that includes intelligent color detection. With its assistance, you may effortlessly take off any scribbles on your screenshot.
The Takeaway
You may find yourself having to share a screenshot that you would have scribbled on. Fortunately, it has become easy to remove any marks on pictures before you share them again. This article gave you five of the apps you can use to edit your screenshots without compromising the quality of your photos.
Δ
title: “How To Remove Scribbles On A Screenshot” ShowToc: true date: “2022-11-27” author: “Jennette Rotondo”
It’s especially annoying when the scribble on the screenshot is red. If your aim is to mask this, you’re going to struggle. With red drawings, you need to use a clone or stamp tool to get rid of them. You can use techniques like blurring because it’ll still be very obvious. A high-end photoshopping software such as Photoshop, getting rid of scribbles is typically accomplished by using the background to mask over the scribbles, resulting in the scribbles disappearing and appearing in the background or screenshot that you selected. If you don’t want to download apps on your Android or iPhone, then you can use an online tool like Photopea (free version of photoshop and you can use it online) which has a clone tool as well as a stamp tool which is all you need to remove scribbles on a screenshot.
How to Remove Scribbles On a Screenshot
1. Using TouchRetouch
It’s horrifying to discover a picture or screenshots that’s been viciously scribbled on, and, understandably, to feel there’s absolutely no hope of fixing it. Well, here’s where you’re wrong. By using the app ‘TouchRetouch,’ available on iOS and Android, you can remove scribbles and drawings on a picture of your choice. The TouchRetouch app will allow you to remove doodles on photos or screenshots on your Android device as well as your iPhone. Getting rid of scribbles can also be done on high-end photoshopping software such as Photoshop and it usually consists of you using the background to mask over the scribbles so that the scribbles disappear and looks like the background or another location of the photo or screenshot that you selected. The TouchRetouch, unfortunately, costs some small change. It’s $1.99 on the day this article was published. Tap ‘Buy’ and, after you confirm your payment method and any other needed information, it will automatically download and install the TouchRetouch app straight to your Android device.
- Choose the location of the screenshot you have a desire to alter or you can take your own.
- There’s several tools to use in the TouchRetouch app, like:
Brush Lasso Erase And Settings.
Each tool, obviously, does something different, however, the tools ‘Brush’ and ‘Lasso’ are the same tool only the way they’re use is different. For example, when you want to remove scribbles from a screenshot, you can either use a big brush and get the general area, or use the lasso tool for slightly more precision.
At any rate, the tool you want to use is the ‘Brush’ tool. Go ahead and select it. You’ll get the opportunity to adjust the size of your brush to the size you need. If it’s small scribblers, go for a smaller brush size. After you’ve select the Brush tool, take your finger and highlight the scribbles you want to erase.
When you’re satisfied with what you’ve highlighted, tap ‘GO’ and the TouchRetouch will remove the object. However, since removing the object leaves a void behind (since the textures were photographed behind the object) TouchRetouch will actually snag the surrounding textures and match the void to the surrounding textures as best as possible. In fact, if you aren’t satisfied with the retexture, you can retouch the photo as many times as you want.
2. Stamp Tool Photoshop
If the background of the rest of the picture and where the scribbles are is similar, then you can use the Stamp Tool. The Clone Stamp tool allows you to paint one part of an image over another part of the same image. To use the Clone Stamp tool, click and hold the rubber stamp icon in the toolbox and select Clone Stamp Tool in the flyout menu. From here, you can adjust the brush size and shape, flow, opacity, and blending modes.
3. Clone Tool In Photoshop
You can use the clone tool in Photoshop which will allow you to use one part of the screenshot to get rid of the scribbles. In Photoshop, the clone tool erases scribbles from pictures by using the information from one part of the image to replace another part of the image which would be the scribbles. To use the clone tool, select the Clone Stamp tool and position the cursor over the area you want to clone and then Alt-click (Windows) or Option-click (Mac) to define the clone source. Once defined, position the cursor over the scribbles so that you can start to paint the cloned pixels to get rid of the scribbled.
4. Gimp
Several digital tools are included in GIMP version 2.8 that may get used to define undesired sections of your image. You should click and drag your cursor around it to determine the region’s boundary you desire to isolate. A keyboard shortcut cuts or deletes the area you have selected, leaving a blank space for you to alter your visual message once it has been created. The Clone tool copies an image or pattern using the current brush as a template. Select the tool icon from the tool palette on the left-hand side of the screen. Clone, adjust the settings you find in the palette below to establish the size of the brush and hardness, then go to the image and pick a source area to be taken to “clone” it above the doodling, and then click on the clone button. Use the Ctrl key to choose the region to be copied, then click on the first piece of the scribble inside the snapshot to select it for copying. The technique has several applications, the most notable of which is fixing damaged regions in digital photographs by “painting over” them with pixel data from other photograph parts. It takes some time to master this method, but it may be pretty effective in the hands of an experienced practitioner.
5. Adobe Photoshop Lightroom
If you attempted to cover over a portion of a screenshot using the brush tool, the resulting region would be flat and devoid of any depth, tone, or shading. As a result, the painted area would be visible to the spectator. Adobe created the Clone Stamp tool in lightroom to allow for more nuanced picture manipulation. The Clone Stamp tool in Photoshop allows you to duplicate one portion of an image onto another section of the same picture. Photographers and designers frequently use the Clone Stamp tool to eliminate undesired components from photographs they have taken or designed. Using it, for example, you may disguise flaws on people’s faces by duplicating them from another section of their skin, or you can eliminate trees from a mountain vista by copying portions of the sky over them. The Clone Stamp allows you to paint with pixels that have been cloned from one piece of a picture and pasted onto another part of it. Consequently, the corrected region is virtually indistinguishable from the remainder of the image. As a result, if you know how to use one of the Clone Stamp’s descendant tools, you can use them all. It is especially true for the Pattern Stamp and Healing Brush, all descended from the Clone Stamp.
6. Adobe Photoshop Fix
Using Photoshop, it is often possible to remove doodles from screenshots and images; however, the operations’ complexity depends on where the mark to be removed is placed. For example, if it is over an area of a monochrome photograph, it will be easier to delete than above the subject. The most common cause for the Clone Stamp to cease operating is that the incorrect layer has gotten selected, which is the default. The improper layer selection in the Layers Panel may cause your edits to be concealed or the wrong sample used in your final image. The Clone Stamp tool in Photoshop Fix provides an even more effective method of copying a portion of a picture to another section of the same photo. Using your finger, press on the “source region” that you wish to replicate, and then drag it to another portion of the same picture with the brush tool.
7. Clip Studio Paint
Featuring a variety of helpful and distinctive features, Clip Studio Paint is a highly adaptable digital painting application that is great for rendering and inking work. It is simple to learn, and it comes with a large number of tools and unique brushes that allow you to paint and create any style of artwork you choose. Clip Studio Paint is the ultimate marriage of Adobe Photoshop and Paint Tool SAI. It is available for both Mac and Windows. It combines the most remarkable features of both programs for painters in a single package at the most competitive price. The tiny Paint Tool SAI application is less intimidating for beginning digital artists, and it is a beautiful beginner’s program for those just starting. Even though Clip Studio Paint is not designed for image editing, it has several ideal functions for cleaning up scans and pictures and preparing your images for printing.
8. inPixio Remove background
InPixio is a collection of independent apps that differ in specialized features and tools designed to deal with a particular photograph component. These tools assist in changing the backdrop of a photograph, removing unwanted parts from a picture, and creating beautiful collages. Suppose you are new to photography and need to quickly and easily enhance your images. In that case, InPixio is the perfect choice for you since it offers several simple-to-use features that eliminate distracting aspects from the picture, as well as a steady learning curve. Many options are available in InPixio, including light control (exposure, brightness, contrast) levels correction (curves, and color correction). Aside from that, the software offers a variety of frames and preset filters, textures, and effects, such as soft focus, noise reduction, and vignette. You can easily erase undesired information from a photograph without sacrificing image quality with the Erase feature. You have the option of deleting the highlighted zones or restoring the background. Editing the image is easier with the pick option that includes intelligent color detection. With its assistance, you may effortlessly take off any scribbles on your screenshot.
The Takeaway
You may find yourself having to share a screenshot that you would have scribbled on. Fortunately, it has become easy to remove any marks on pictures before you share them again. This article gave you five of the apps you can use to edit your screenshots without compromising the quality of your photos.
Δ
